概要
作成したWebが暗号化通信されるように、SSL(Secure Sockets Layer) / TLS (Transport Layer Security) の設定を行います。
SSLの設定では証明書というものが必要ですが、証明書は通常、認証局から身元確認のようなものを経て有料で発行してもらいます。これを無償で発行してくれるLet's Encryptという認証局があります。
今回はLet's Encrypを使ってサーバーをSSL化します。

事前準備
事前に実施しておくコンテンツ
次のコンテンツが終了していることが前提です。
完成イメージ
SSLが設定されていないWebサイトにSSLを設定します。

設定すると、アドレスバーの部分に鍵のマークが表示されるようになります。
また、httpsというURLでアクセスできるようなります。

手順
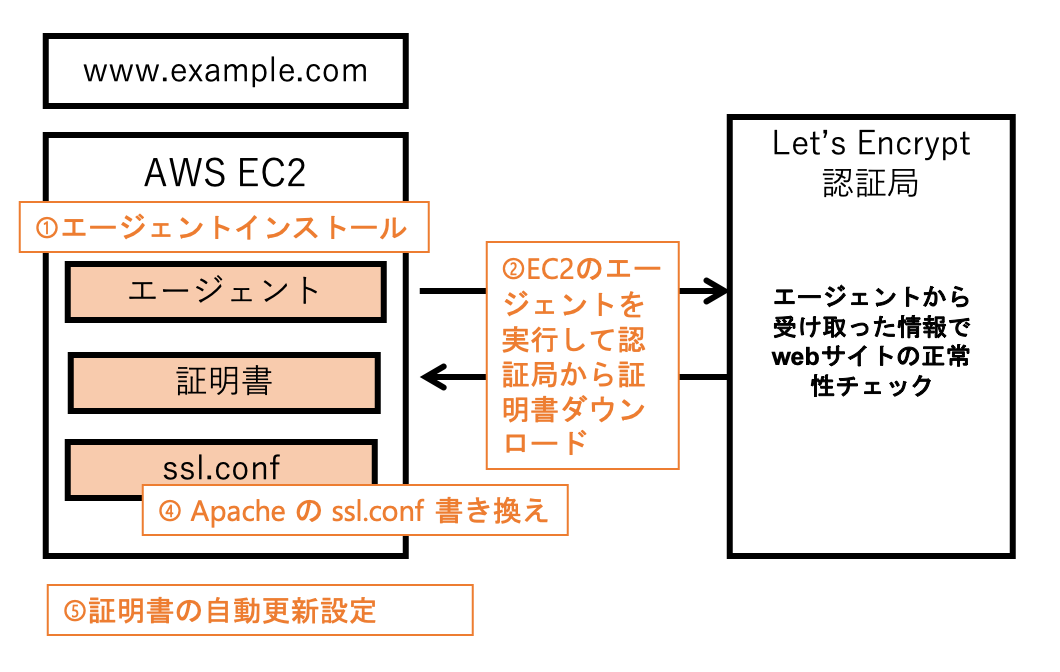
SSlの設定は、まずSSL証明書を発行する certbotクライアントをインストールし、それを実行して証明書を発行します。
次に、証明書をサーバーに登録します。サーバーに登録するには、WebサーバーであるApacheのsslの設定ファイル ssl.conf に発行した証明書を設定します。これでSSLの設定ができます。
ただし、Let'sEncryptの証明書は有効期限が3ヶ月なので、3ヶ月が経過する前に更新作業を行わなければなりません。その更新作業をタイムスケジューラの役割をもつcrontabという機能を利用して、自動実行してくれるように設定します。

大まかな手順を次にまとめました。
- SSL証明書発行クライアントツール(Let'sEncrypt)のインストール
- SSL証明書をサーバーに設定
- SSL証明書の自動更新設定
SSLの設定
以下のサイトにSSLの設定を行います。
アドレスバーには 保護されていない通... という 表示が確認できます。これはSSLが設定されていない事を表しています。

証明書を発行する
Let'sEncryptを使って証明書を発行します。
ターミナルを起動し、設定するサーバーにSSHで接続しておきます。
mod24_ssl をインストールする
サーバーにSSLを設定するにはWebサーバーであるApacheのsslモジュール、mod_sslが必要です。mod_sslをインストールします。
$ sudo yum install -y mod_sslcertbotクライアントをインストールする
次に、Let's Encryptの証明書を発行するクライアントツールをインストールします。
certbot は epelというリポジトリに含まれているので、先にepelをインストールします。
$ sudo amazon-linux-extras install epel次にcertbotをインストールします。
$ sudo yum install certbot証明書を発行する
証明書を発行します。次のコマンドを実行します。
$ sudo certbot certonly実行すると、下記のようにいくつか質問されるので解答を入力していきます。
- How would you like to authenticate with the ACME CA? : 2
- Enter email address : 管理者のメールアドレス
- Please read the Terms of Service... : a
- Would you be willing to share your email address...: y or n どちらでも可
- Please enter in your domain name(s) : ドメイン名
- Input the webroot for <ドメイン名>: webのドキュメントルート
2つ目の管理者のメールアドレスは、自分のメールアドレスを設定してください。
5つ目のドメイン名はWebサイトのURLとなるホスト名までいれたドメイン名をいれてください。例えば http://www.test.com でWebサイトにアクセスしている場合は、www.test.com を入力します。
6つ目のWebのドキュメントルートは、ブラウザにhttp://www.test.com でアクセスした時に表示されるコンテンツファイルを置いてある場所です。
Apacheの設定を特に変更していなければ /var/www/html がドキュメントルートです。
Saving debug log to /var/log/letsencrypt/letsencrypt.log

How would you like to authenticate with the ACME CA?
- - - - - - - - - - - - - - - - - - - - - - - - - - - - - - - - - - - - - - - -
1: Spin up a temporary webserver (standalone)
2: Place files in webroot directory (webroot)
- - - - - - - - - - - - - - - - - - - - - - - - - - - - - - - - - - - - - - - -
Select the appropriate number [1-2] then [enter] (press 'c' to cancel): 2
Plugins selected: Authenticator webroot, Installer None
Enter email address (used for urgent renewal and security notices) (Enter 'c' to
cancel): admin@test.com

- - - - - - - - - - - - - - - - - - - - - - - - - - - - - - - - - - - - - - - -
Please read the Terms of Service at
https://letsencrypt.org/documents/LE-SA-v1.2-November-15-2017.pdf. You must
agree in order to register with the ACME server at
https://acme-v02.api.letsencrypt.org/directory
- - - - - - - - - - - - - - - - - - - - - - - - - - - - - - - - - - - - - - - -
(A)gree/(C)ancel: a

- - - - - - - - - - - - - - - - - - - - - - - - - - - - - - - - - - - - - - - -
Would you be willing to share your email address with the Electronic Frontier
Foundation, a founding partner of the Let's Encrypt project and the non-profit
organization that develops Certbot? We'd like to send you email about our work
encrypting the web, EFF news, campaigns, and ways to support digital freedom.
- - - - - - - - - - - - - - - - - - - - - - - - - - - - - - - - - - - - - - - -
(Y)es/(N)o: n
Please enter in your domain name(s) (comma and/or space separated)  (Enter 'c'
to cancel): test.bluecode.io
Obtaining a new certificate
Performing the following challenges:
http-01 challenge for test.bluecode.io
Input the webroot for test.bluecode.io: (Enter 'c' to cancel): /var/www/html
Waiting for verification...
Cleaning up challenges

IMPORTANT NOTES:
 - Congratulations! Your certificate and chain have been saved at:
   /etc/letsencrypt/live/test.bluecode.io/fullchain.pem
   Your key file has been saved at:
   /etc/letsencrypt/live/test.bluecode.io/privkey.pem
   Your cert will expire on 2019-08-05. To obtain a new or tweaked
   version of this certificate in the future, simply run certbot
   again. To non-interactively renew *all* of your certificates, run
   "certbot renew"
 - Your account credentials have been saved in your Certbot
   configuration directory at /etc/letsencrypt. You should make a
   secure backup of this folder now. This configuration directory will
   also contain certificates and private keys obtained by Certbot so
   making regular backups of this folder is ideal.
 - If you like Certbot, please consider supporting our work by:

   Donating to ISRG / Let's Encrypt:   https://letsencrypt.org/donate
   Donating to EFF:                    https://eff.org/donate-le
Webサーバーに証明書設定
証明書は /etc/letsencrypt/live/<ドメイン名>ディレクトリの中に出力されています。
まずドメイン名のディレクトリができているか確認します。
$ sudo ls -al /etc/letsencrypt/live
合計 20
drwx------ 4 root root 4096  4月 22 17:46 .
drwxr-xr-x 9 root root 4096  4月 22 17:46 ..
-rw-r--r-- 1 root root  740  4月 22 17:44 README
drwxr-xr-x 2 root root 4096  4月 22 17:44 www.example.com
次に、作成されたドメイン名のディレクトリ中に入っている証明書ファイルを確認します。
$ sudo ls -al /etc/letsencrypt/live/<ドメイン名>
合計 12
drwxr-xr-x 2 root root 4096  4月 22 17:44 .
drwx------ 4 root root 4096  4月 22 17:46 ..
-rw-r--r-- 1 root root  692  4月 22 17:44 README
lrwxrwxrwx 1 root root   41  4月 22 17:44 cert.pem -> ../../archive/<ドメイン名>/cert1.pem
lrwxrwxrwx 1 root root   42  4月 22 17:44 chain.pem -> ../../archive/<ドメイン名>/chain1.pem
lrwxrwxrwx 1 root root   46  4月 22 17:44 fullchain.pem -> ../../archive/<ドメイン名>/fullchain1.pem
lrwxrwxrwx 1 root root   44  4月 22 17:44 privkey.pem -> ../../archive/<ドメイン名>/privkey1.pem
次に、先程確認した証明書ファイルを、sslの設定ファイルに追記します。
$ sudo vi /etc/httpd/conf.d/ssl.conf次の+の行の部分をそれぞれ作成したファイルのパスに変更します。
(100、107、116行目あたり)
/etc/httpd/conf.d/ssl.conf
#   Server Certificate:
# Point SSLCertificateFile at a PEM encoded certificate.  If
# the certificate is encrypted, then you will be prompted for a
# pass phrase.  Note that a kill -HUP will prompt again.  A new
# certificate can be generated using the genkey(1) command.
+ SSLCertificateFile /etc/letsencrypt/live/test.bluecode.io/cert.pem

#   Server Private Key:
#   If the key is not combined with the certificate, use this
#   directive to point at the key file.  Keep in mind that if
#   you've both a RSA and a DSA private key you can configure
#   both in parallel (to also allow the use of DSA ciphers, etc.)
+ SSLCertificateKeyFile /etc/letsencrypt/live/test.bluecode.io/privkey.pem

#   Server Certificate Chain:
#   Point SSLCertificateChainFile at a file containing the
#   concatenation of PEM encoded CA certificates which form the
#   certificate chain for the server certificate. Alternatively
#   the referenced file can be the same as SSLCertificateFile
#   when the CA certificates are directly appended to the server
#   certificate for convinience.
+ SSLCertificateChainFile /etc/letsencrypt/live/test.bluecode.io/fullchain.pem
変更したら保存して終了します。
次に設定を反映させるためにWebサーバーを再起動します。
$ sudo systemctl restart httpd確認
設定したドメインをブラウザで確認します。
アドレスバーの部分が、httpsで表示されていれば設定完了です。

SSLの更新設定
次に、SSL証明書が自動更新されるように設定します。
Let's Encryptの証明書は3ヶ月なので、3ヶ月が経過する前に証明書が更新されるように設定します。
証明書の更新はcronというOSのスケジューラのような機能を利用してスケジュール実行します。
更新コマンド
証明書の更新はcertbotクライアントツールを利用してターミナルから certbot renew
有効期限の30日以内にならないと、更新がかからないので、テスト実行で動作を確認したい場合は --dry-run オプションで確認できます。
更新後は、Webサーバーを起動する必要があるので、--post-hook オプションを使用して、実行後に再起動コマンドが実行されるように設定します。
まず--dry-runオプションを利用してコマンドをテスト実行します。
rootユーザーに切り替えます。
$ suパスワードを聞かれるので、AWSの設定1で変更したrootのパスワードを入力してください。
次に、証明書更新のテスト実行を行います。
# certbot --dry-run renew --post-hook "systemctl restart httpd"テスト実行が成功すると以下のように表示されます。
Saving debug log to /var/log/letsencrypt/letsencrypt.log

- - - - - - - - - - - - - - - - - - - - - - - - - - - - - - - - - - - - - - - -
Processing /etc/letsencrypt/renewal/<ドメイン名>.conf
- - - - - - - - - - - - - - - - - - - - - - - - - - - - - - - - - - - - - - - -
Cert not due for renewal, but simulating renewal for dry run
Plugins selected: Authenticator webroot, Installer None
Renewing an existing certificate

- - - - - - - - - - - - - - - - - - - - - - - - - - - - - - - - - - - - - - - -
new certificate deployed without reload, fullchain is
/etc/letsencrypt/live/<ドメイン名>/fullchain.pem
- - - - - - - - - - - - - - - - - - - - - - - - - - - - - - - - - - - - - - - -

- - - - - - - - - - - - - - - - - - - - - - - - - - - - - - - - - - - - - - - -
** DRY RUN: simulating 'certbot renew' close to cert expiry
**          (The test certificates below have not been saved.)

Congratulations, all renewals succeeded. The following certs have been renewed:
  /etc/letsencrypt/live/<ドメイン名>/fullchain.pem (success)
** DRY RUN: simulating 'certbot renew' close to cert expiry
**          (The test certificates above have not been saved.)
- - - - - - - - - - - - - - - - - - - - - - - - - - - - - - - - - - - - - - - -
Running post-hook command: systemctl restart httpd
cronの設定
cronで証明書更新のスケジュール実行を設定します。
cronの設定はいくつか方法がありますが、今回はユーザーごとに設定できる crontab -u を利用して設定します。
更新はroot権限が必要なので、rootユーザーのcron設定とし、cron設定を記述したファイルを/root/letsencryptに作成します。
ファイルを作成します。
# vi /root/letsencrypt次の内容を追加して保存します。
0 3 2 は毎週火曜日午前3時に実行するという記述です。
その後ろに実行したいコマンドを記述します。
/root/letsencrypt
0 3 * * 2 certbot renew --post-hook "systemctl restart httpd"追加したファイルをcronに登録します。
# crontab -u root /root/letsencrypt登録されているか、次のコマンドで確認します。
# crontab -l
0 3 * * 2 certbot renew --post-hook "systemctl restart httpd"
設定されていることが確認できれば完了です。
更新の確認
火曜日になって、実行されているかどうかを確認する場合は次のコマンドでログを確認することができます。
$ sudo tail -f /var/log/cron