
概要
注文を受け付けたデータを管理画面で管理できるようにします。
管理画面に受注一覧と注文商品詳細を表示します。
その注文状況(受付中・発送済)も管理できるようにしていきます。
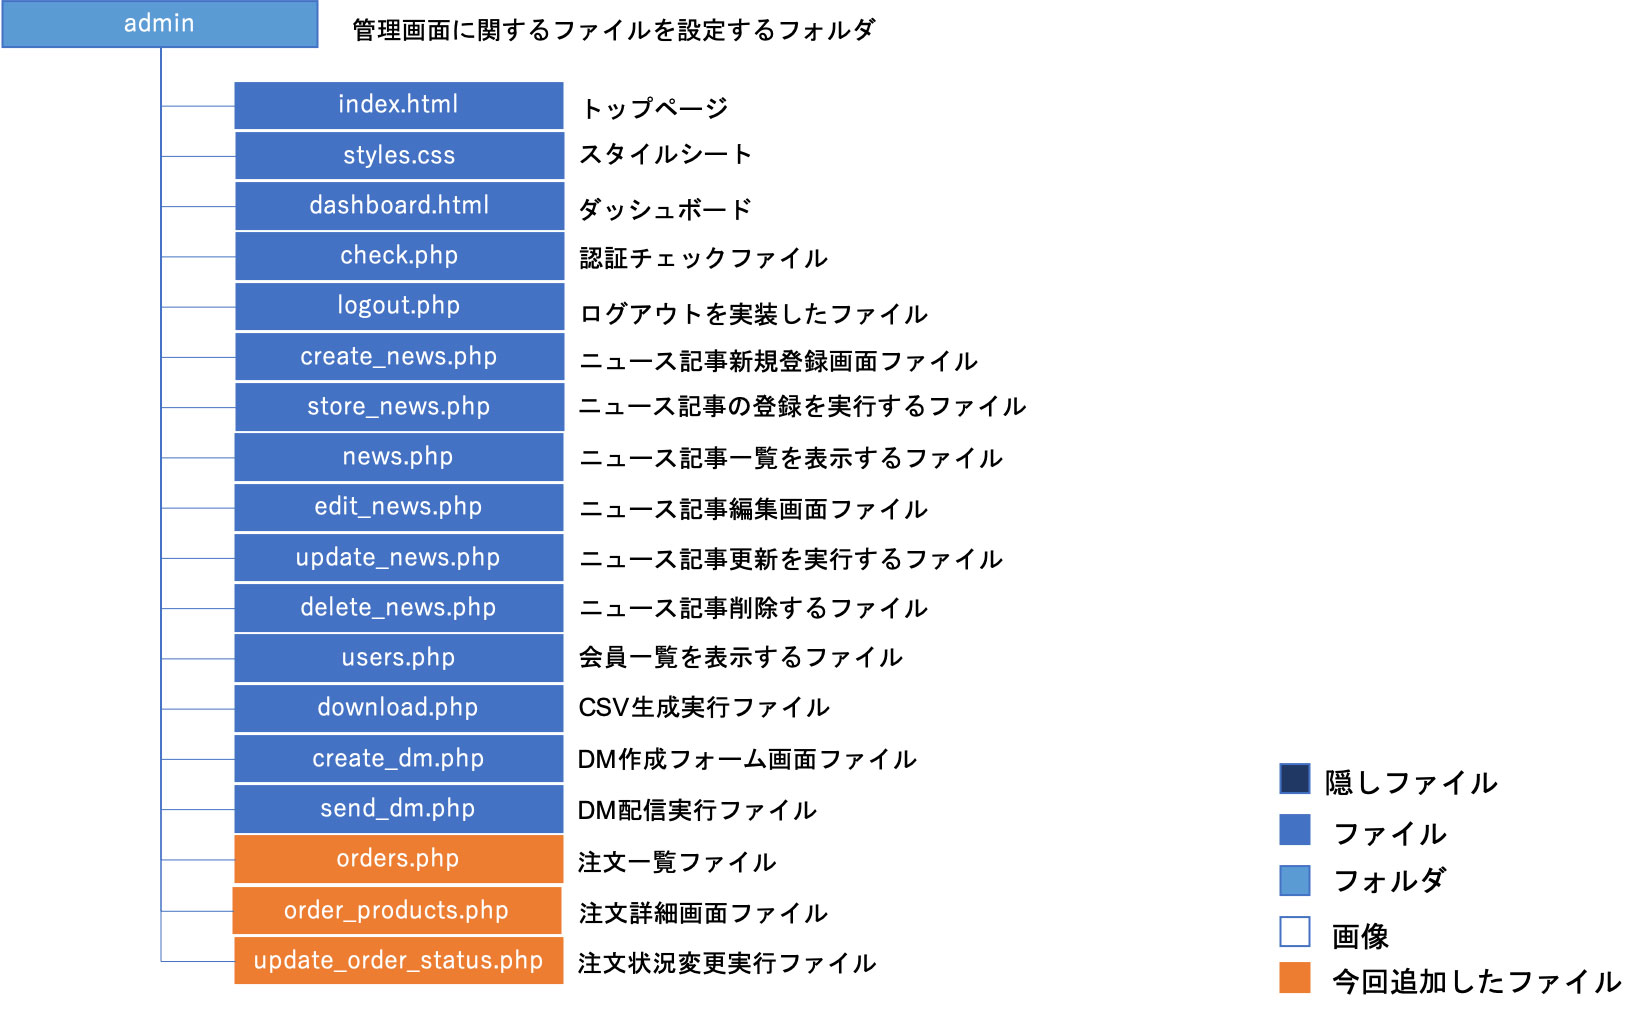
フォルダ階層
完成イメージ
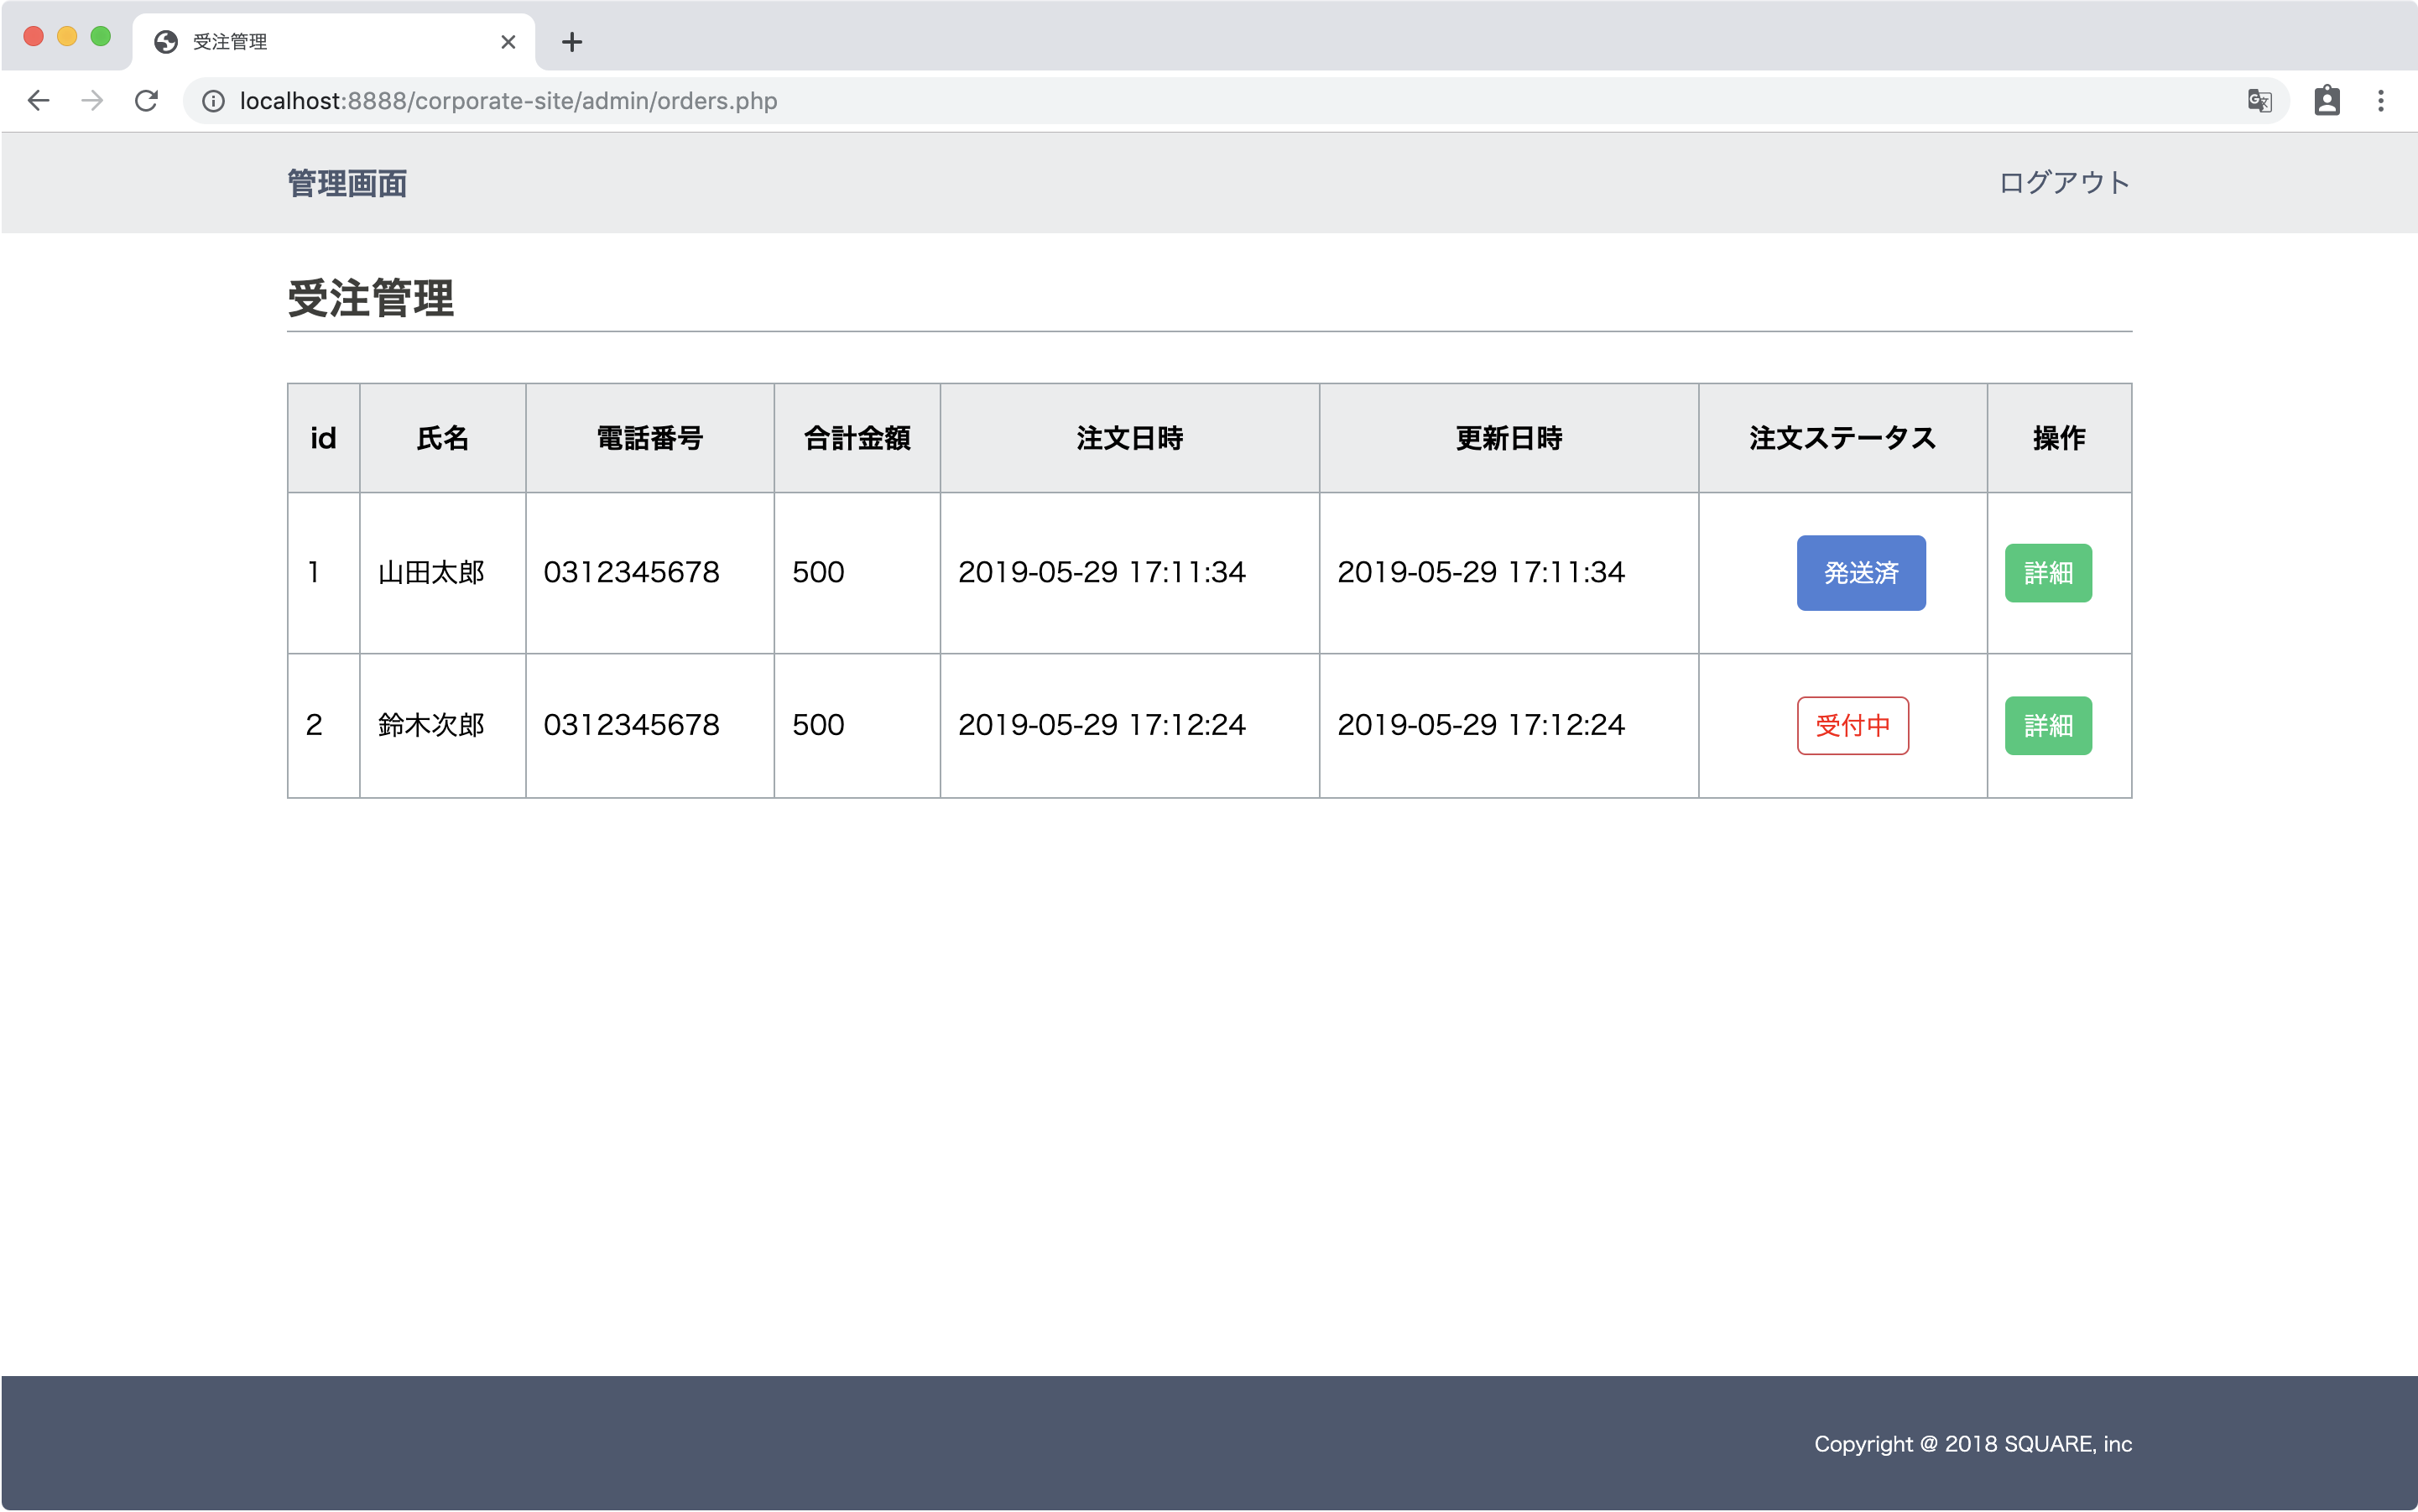
一覧
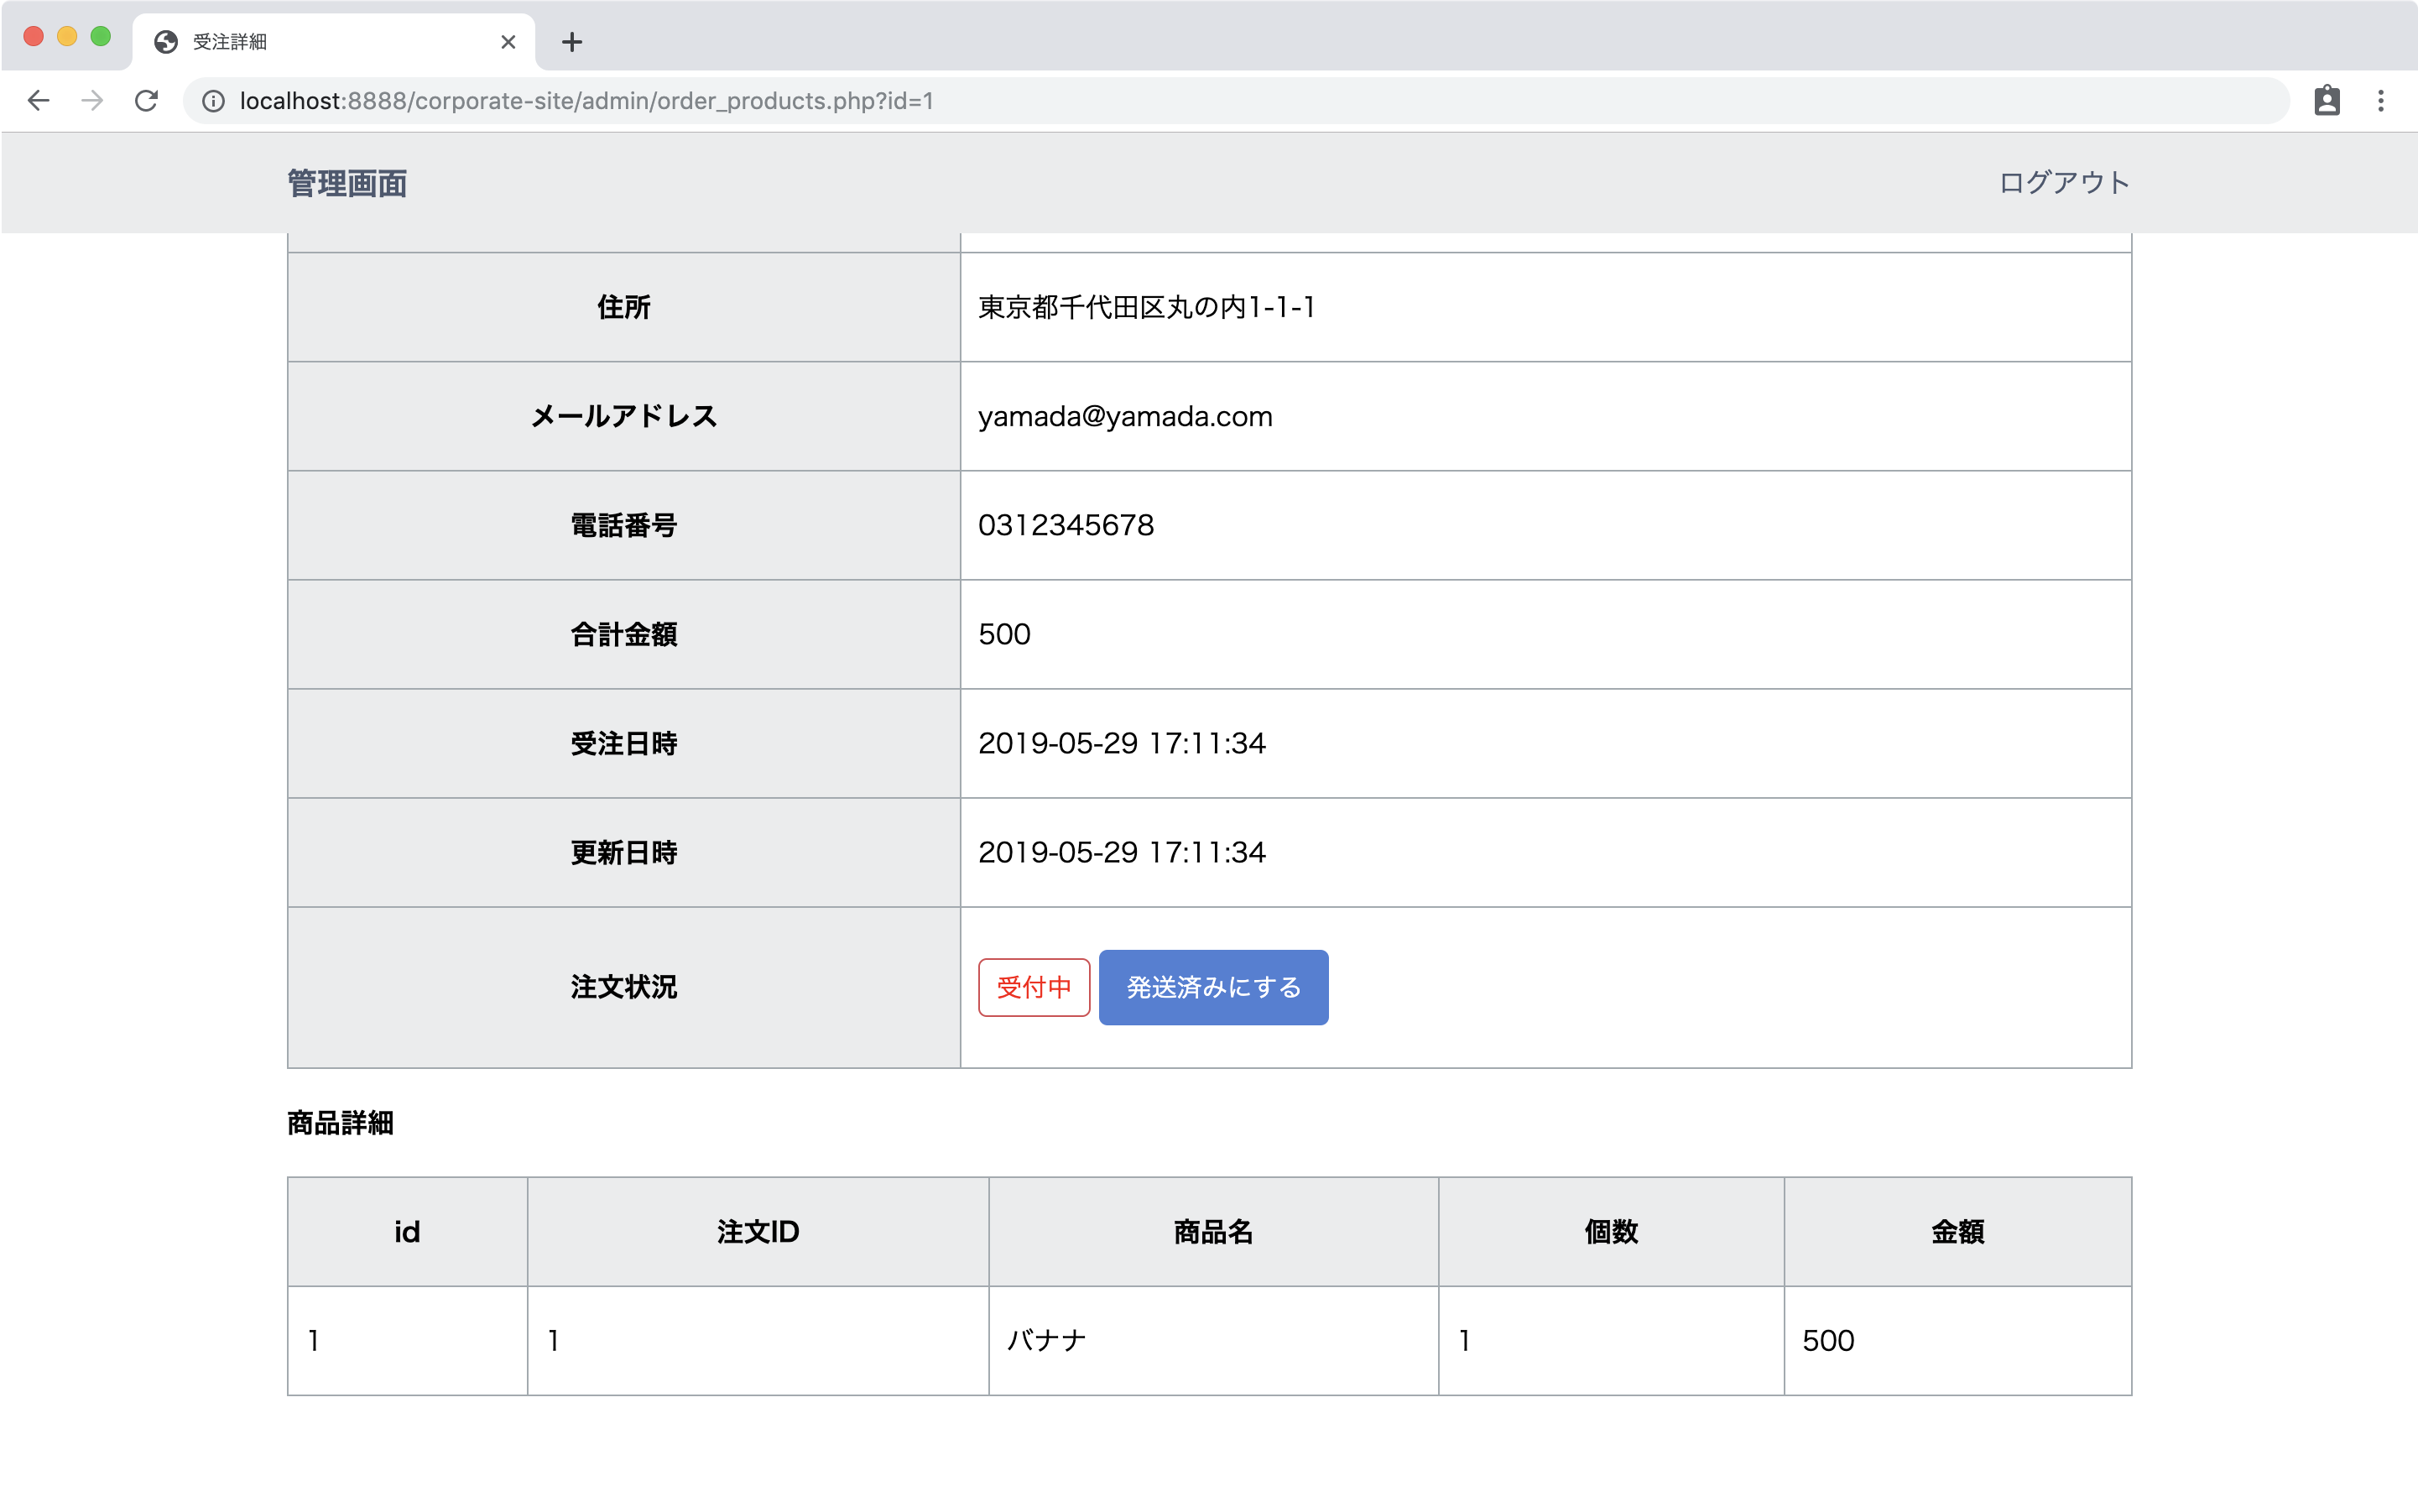
詳細
全体の手順
手順は以下のとおりです
- 注文状況ステータスカラムの追加
- 管理画面作成
- 注文状況ステータス変更の実装
注文状況ステータスカラムの追加
注文状況は注文テーブルで管理するのがいいので、ordersにorder_statusというカラムを追加します。
order_statusはint型で作り、0が受付中、1が発送済を表すことにします。
また、注文を受け付けた時点では必ず受付中のステータスなので、デフォルトで0が入るようにオプションを設定します。
console
mysql> alter table orders add column order_status int default 0;
Query OK, 0 rows affected (0.05 sec)
Records: 0  Duplicates: 0  Warnings: 0
Query OKとなっていればOKです。
追加できているか確認します。
console
mysql> desc orders;
+--------------+--------------+------+-----+---------+----------------+
| Field        | Type         | Null | Key | Default | Extra          |
+--------------+--------------+------+-----+---------+----------------+
| id           | int(11)      | NO   | PRI | NULL    | auto_increment |
| name         | varchar(256) | YES  |     | NULL    |                |
| email        | varchar(256) | YES  |     | NULL    |                |
| postcode     | int(11)      | YES  |     | NULL    |                |
| address      | varchar(256) | YES  |     | NULL    |                |
| tel          | varchar(13)  | YES  |     | NULL    |                |
| total        | int(11)      | YES  |     | NULL    |                |
| created_at   | datetime     | YES  |     | NULL    |                |
| updated_at   | datetime     | YES  |     | NULL    |                |
| order_status | int(11)      | YES  |     | 0       |                |
+--------------+--------------+------+-----+---------+----------------+
最後にorder_statusが追加されていればOKです。
管理画面作成
管理画面を作成しています。
管理画面はadminフォルダ内に作成していきます。
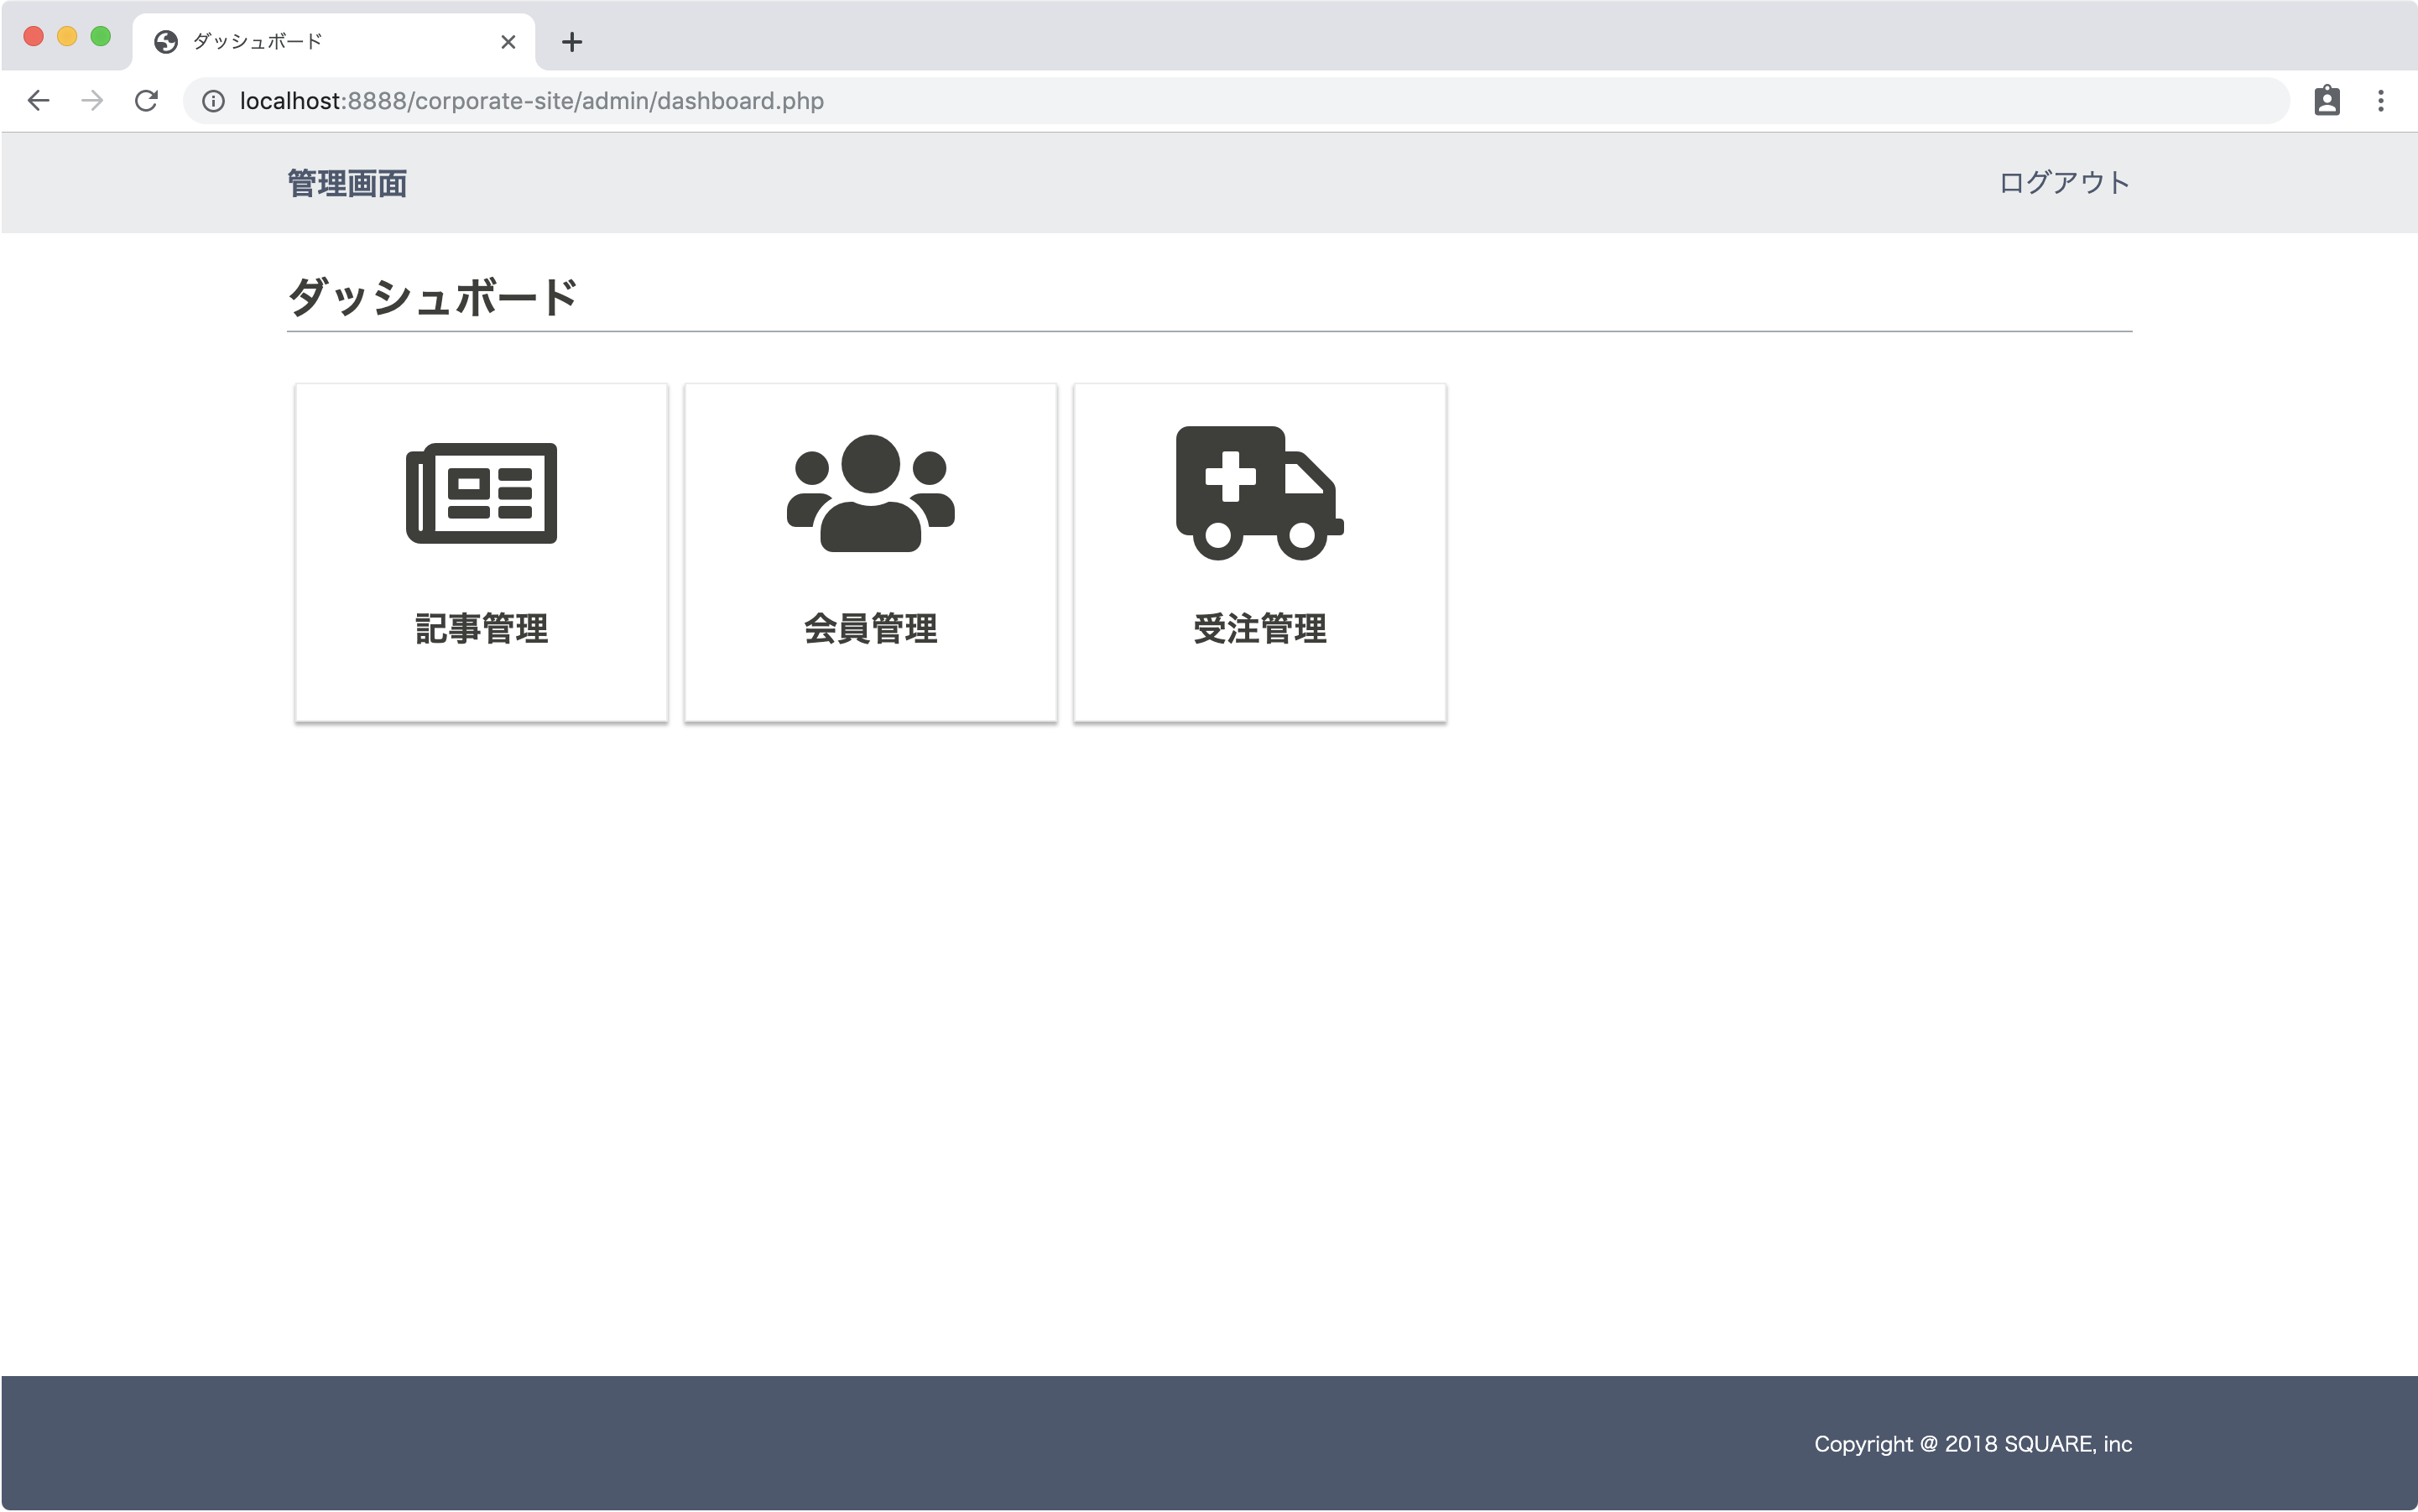
ダッシュボードに追加
ダッシュボードに受注管理メニューを追加します。
admin/dashboard.php
 <div class="boxs">
    <a href="news.php" class="box">
        <i class="far fa-newspaper icon"></i>
        <p>記事管理</p>
    </a>
    <a href="users.php" class="box">
        <i class="fas fa-users icon"></i>
        <p>会員管理</p>
    </a>
+   <a href="orders.php" class="box">
+       <i class="fas fa-ambulance icon"></i>
+       <p>受注管理</p>
+   </a>

 </div>
管理画面にログインしてダッシュボードを確認します。
一覧作成
注文一覧を作成します。
注文一覧はordersの情報を表示します。
adminフォルダにorders.phpを作成します。
ログインチェック
admin/orders.php
<?php
    session_start();

    if($_SESSION['admin_login'] == false){
        header("Location:./index.html");
        exit;
    }

?>
ordersを取得
DBに接続して、SELECT文でordersを取得して$ordersに配列で格納します。
会員一覧を作成したときと同様にページング等も付けられますが、今回は割愛します。
admin/orders.php
 <?php
    session_start();

    if($_SESSION['admin_login'] == false){
        header("Location:./index.html");
        exit;
    }

+   //DB接続
+   try{
+       $dbh = new PDO("mysql:host=localhost;dbname=corporate_db","root","root");
+   }catch(PDOException $e){
+       var_dump($e->getMessage());
+       exit;
+   }
+   $stmt = $dbh->prepare("SELECT * FROM orders");
+   $stmt->execute();
+   $orders = $stmt->fetchAll(PDO::FETCH_ASSOC);

 ?>
表示
取得したデータを表示します。
phpの下にHTMLを記述します。
構造がほとんど一緒なので、admin/news.phpの<!DOCTYPE html>〜</html>をコピーして貼り付けます。
タイトルやh3タグを受注管理に変更し、テーブルタグ内を削除します。
「投稿する」ボタンも削除します。
javascriptのdeleteボタンのfunctionも削除します。
admin/orders.php
?>
<!DOCTYPE html>
<html>

<head>
    <!-- Global site tag (gtag.js) - Google Analytics -->
    <script async src="https://www.googletagmanager.com/gtag/js?id=UA-13xxxxxxxxx"></script>
    <script>
        window.dataLayer = window.dataLayer || [];
        function gtag() { dataLayer.push(arguments); }
        gtag('js', new Date());

        gtag('config', 'UA-13xxxxxxxxx');
    </script>

    <meta charset="utf-8">
    <meta http-equiv="X-UA-Compatible" content="IE=edge">
    <meta name="viewport" content="width=device-width, initial-scale=1.0">

    <title>受注管理</title>

    <link rel="icon" href="favicon.ico">
    <link rel="stylesheet" href="https://use.fontawesome.com/releases/v5.8.1/css/all.css"
        integrity="sha384-50oBUHEmvpQ+1lW4y57PTFmhCaXp0ML5d60M1M7uH2+nqUivzIebhndOJK28anvf" crossorigin="anonymous">

    <!-- css -->
    <link rel="stylesheet" href="./styles.css">
</head>

<body>
    <header>
        <div class="container">
            <div class="header-logo">
                <h1><a href="dashboard.php">管理画面</a></h1>
            </div>

            <nav class="menu-right menu">
                <a href="logout.php">ログアウト</a>
            </nav>
        </div>
    </header>
    <main>
        <div class="wrapper">
            <div class="container">
                <div class="wrapper-title">
                    <h3>受注管理</h3>
                </div>
                <div class="list">
                    <table>

                    </table>
                </div>
            </div>
        </div>
    </main>
    <footer>
        <div class="container">
            <p>Copyright @ 2018 SQUARE, inc</p>
        </div>
    </footer>
    <script src="https://ajax.googleapis.com/ajax/libs/jquery/3.2.1/jquery.min.js"></script>
</body>

</html>
table内に表示していきます。
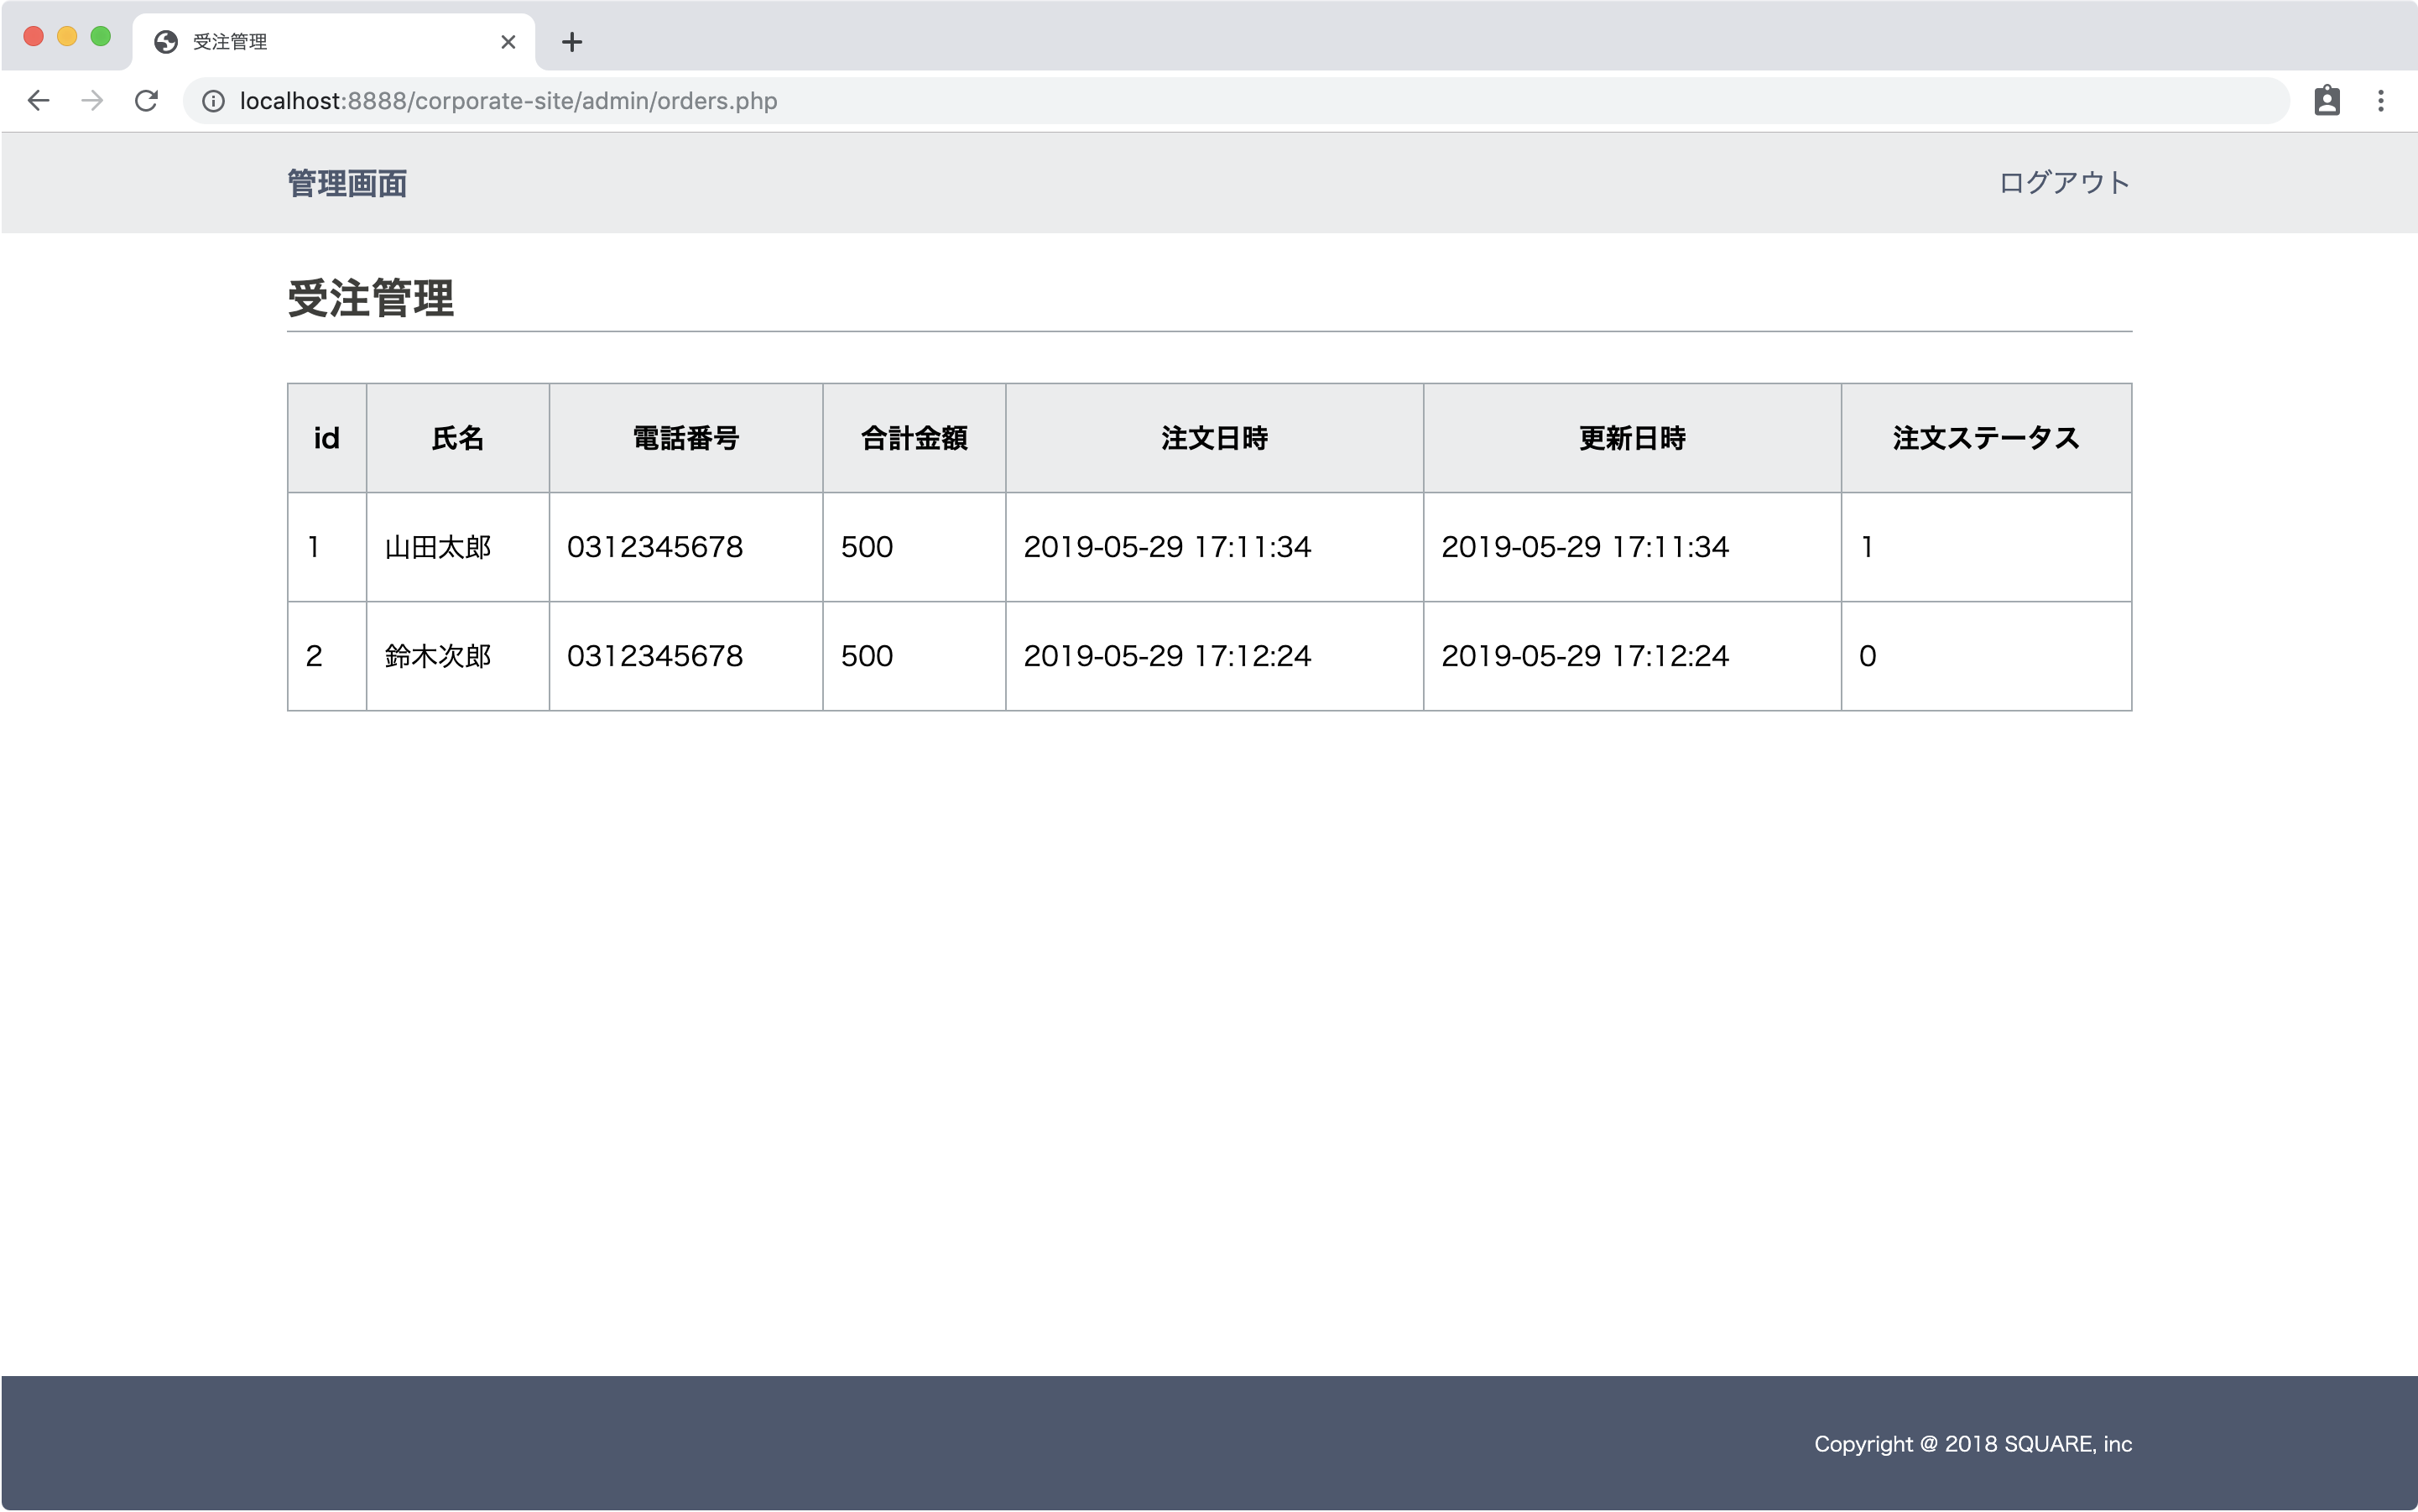
phpで取得した$ordersをforeachで回しながら表示します。
すべての情報ではなく一部のデータを表示するようにしました。
admin/orders.php
 <table>
+   <thead>
+       <tr>
+           <th>id</th>
+           <th>氏名</th>
+           <th>電話番号</th>
+           <th>合計金額</th>
+           <th>注文日時</th>
+           <th>更新日時</th>
+           <th>注文ステータス</th>
+       </tr>
+   </thead>
+   <tbody>
+       <?php foreach($orders as $order): ?>
+       <tr>
+           <td><?php echo $order['id']; ?></td>
+           <td><?php echo $order['name']; ?></td>
+           <td><?php echo $order['tel']; ?></td>
+           <td><?php echo $order['total']; ?></td>
+           <td><?php echo $order['created_at']; ?></td>
+           <td><?php echo $order['updated_at']; ?></td>
+           <td><?php echo $order['order_status']; ?></td>
+       </tr>
+       <?php endforeach; ?>
+   </tbody>
 </table>
確認するとこうなっています。
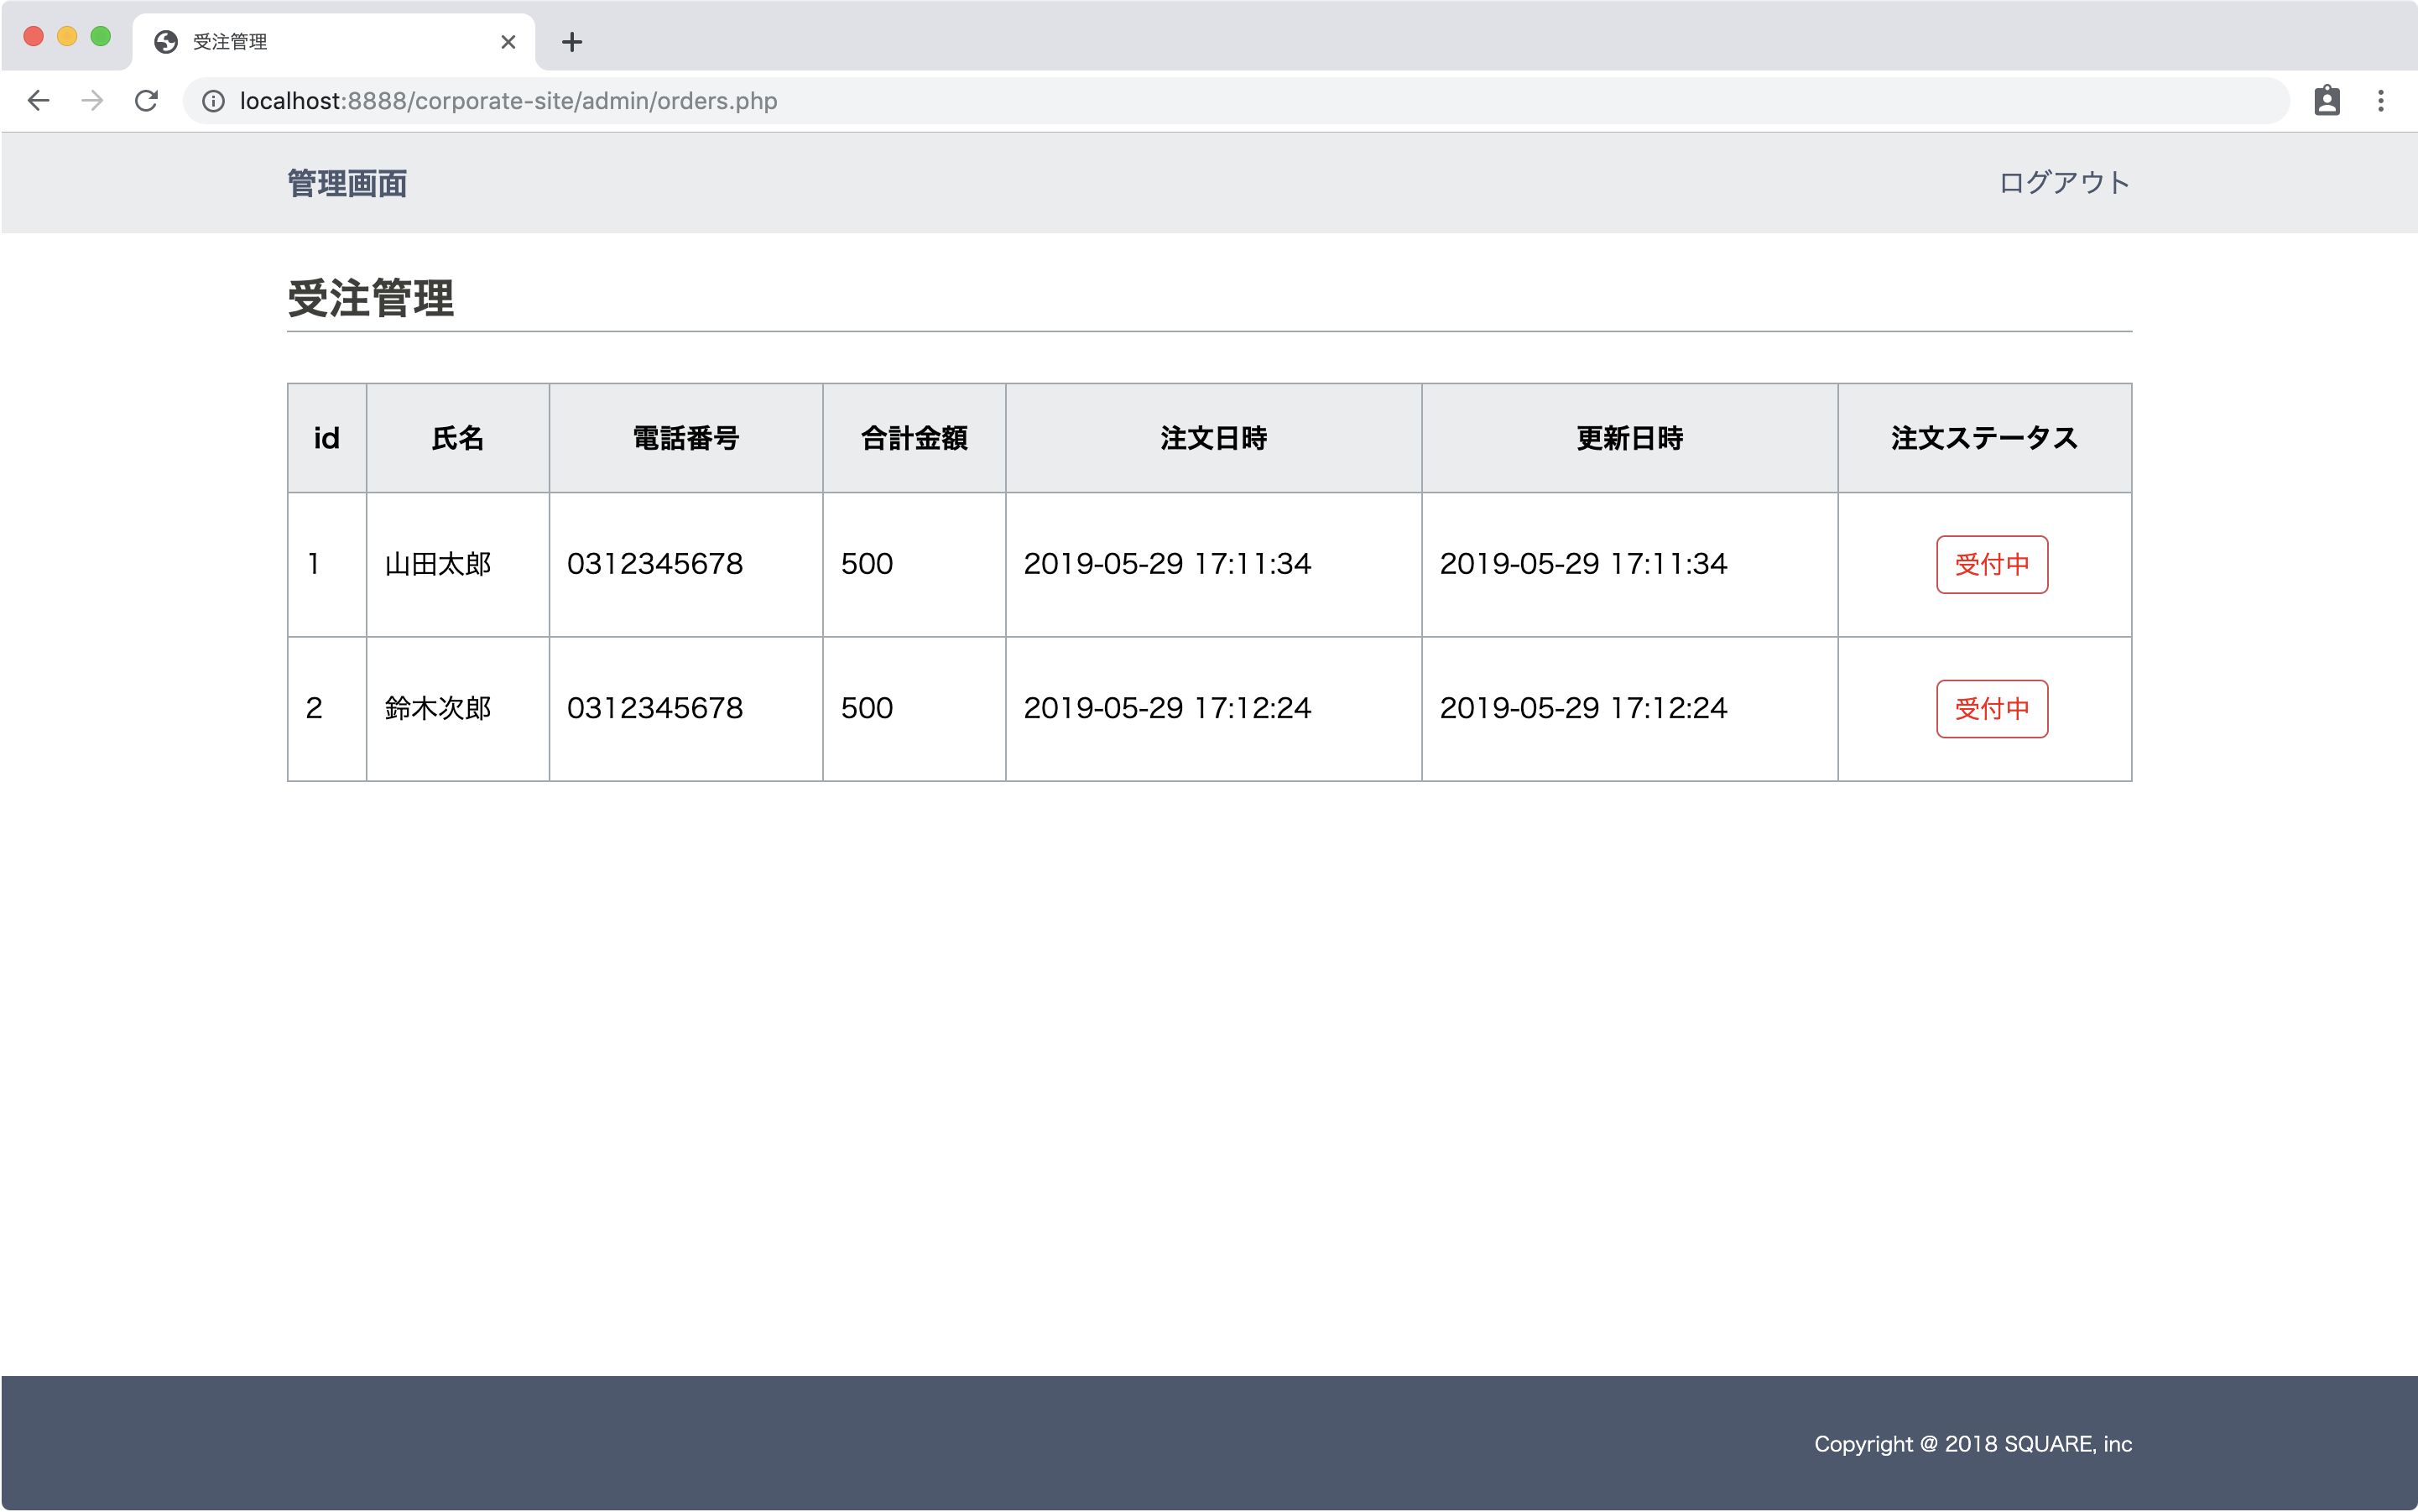
注文ステータスを「受付中」「発送済」という表示にします。
if文で、もしorder_statusが0だったら<button class="btn btn-red">受付中</button>を表示し、それ以外は<button class="btn btn-green">発送済</a></button>を表示するように記述しました。
admin/orders.php
 <tr>
    <td><?php echo $order['id']; ?></td>
    <td><?php echo $order['name']; ?></td>
    <td><?php echo $order['tel']; ?></td>
    <td><?php echo $order['total']; ?></td>
    <td><?php echo $order['created_at']; ?></td>
    <td><?php echo $order['updated_at']; ?></td>
-   <td><?php echo $order['order_status']; ?></td>
+   <td>
+       <?php if($order['order_status']==0): ?>
+          <button type="button" class="btn btn-red">受付中</button>
+       <?php else: ?>
+          <button type="button" class="btn btn-blue">発送済</a></button>
+       <?php endif;?>
+   </td>
 </tr>
ステータスの表示が変わったことを確認します。
詳細画面
次に、注文者情報の詳細と注文された商品を表示するorder_products.phpを作成します。
詳細ボタン追加
一覧に「詳細」ボタンを追加します。
詳細ボタンはorder_products.phpに飛ぶように設定していますが、おしりにidパラメータを付けて、ordersのidが入るように設定しています。
admin/orders.php
 <table>
    <thead>
        <tr>
            <th>id</th>
            <th>氏名</th>
            <th>電話番号</th>
            <th>合計金額</th>
            <th>注文日時</th>
            <th>更新日時</th>
            <th>注文ステータス</th>
+           <th>操作</th>
        </tr>
    </thead>
    <tbody>
        <?php foreach($orders as $order): ?>
        <tr>
            <td><?php echo $order['id']; ?></td>
            <td><?php echo $order['name']; ?></td>
            <td><?php echo $order['tel']; ?></td>
            <td><?php echo $order['total']; ?></td>
            <td><?php echo $order['created_at']; ?></td>
            <td><?php echo $order['updated_at']; ?></td>
            <td>
                <?php if($order['order_status']==0): ?>
                    <button type="button" class="btn btn-red">受付中</button>
                <?php else: ?>
                    <button type="button" class="btn btn-blue">発送済</a></button>
                <?php endif;?>
            </td>
+            <td>
+               <button type="button" class="btn btn-green" onclick="location.href='order_products.php?id=<?php echo $order['id']; ?>'">詳細</button>
+            </td>
        </tr>
        <?php endforeach; ?>
    </tbody>
 </table>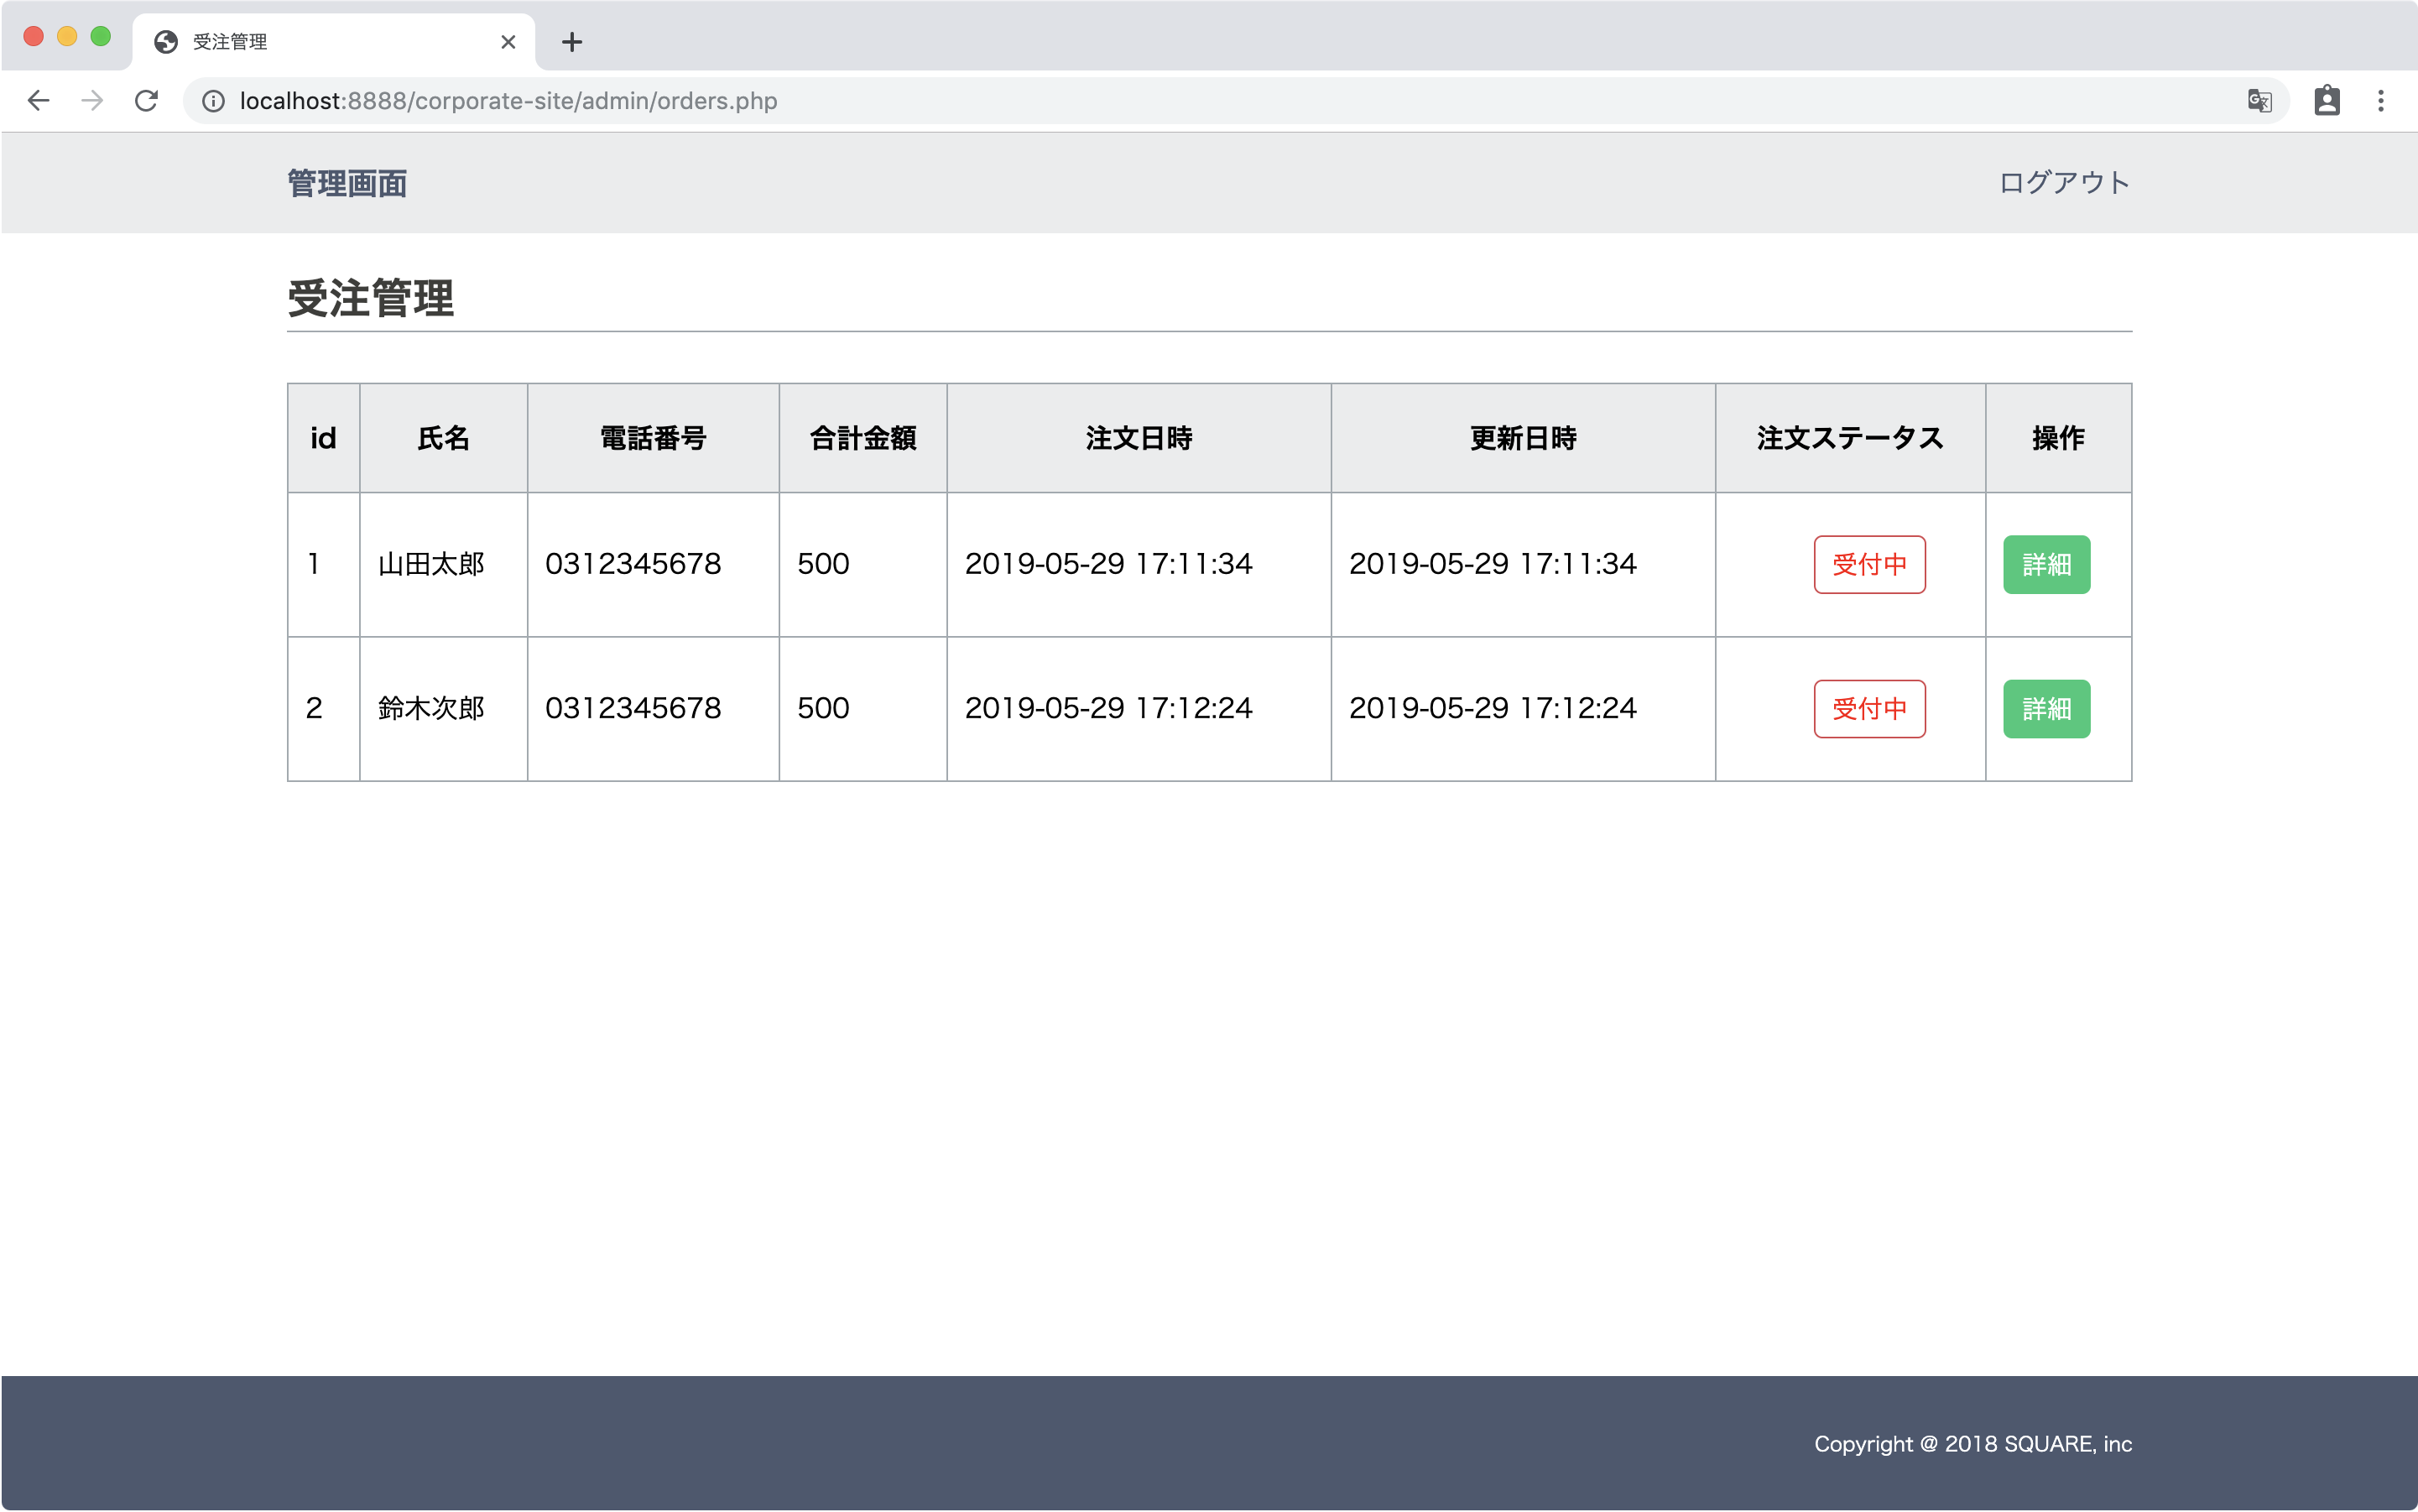
詳細ボタンが追加されました。
詳細画面作成
adminフォルダにorder_products.phpを作成します。
ログインチェックと送られてくるパラメータを受け取ります。
admin/order_products.php
<?php
    session_start();

    if($_SESSION['admin_login'] == false){
        header("Location:./index.html");
        exit;
    }

    $id = isset($_GET['id'])? htmlspecialchars($_GET['id'], ENT_QUOTES, 'utf-8'):'';
もし、idが送られてこない場合は表示するものが無いのでorders.phpに戻します。
admin/order_products.php
    $id = isset($_GET['id'])? htmlspecialchars($_GET['id'], ENT_QUOTES, 'utf-8'):'';

+   if($id==''){
+       header('location:./orders.php');
+   }
idが取得できたら、DBに接続してSELECT文でordersテーブルとorder_productsテーブルのデータを取得します。
admin/order_products.php
    if($id==''){
        header('location:./orders.php');
    }

+   //DB接続
+   try{
+       $dbh = new PDO("mysql:host=localhost;dbname=corporate_db","root","root");
+   }catch(PDOException $e){
+       var_dump($e->getMessage());
+       exit;
+   }

+   //orders
+   $stmt1 = $dbh->prepare("SELECT * FROM orders WHERE id=:id");
+   $stmt1->bindParam(':id',$id);
+   $stmt1->execute();
+   $orders = $stmt1->fetchAll(PDO::FETCH_ASSOC);

+   //order_products
+   $stmt2 = $dbh->prepare("SELECT * FROM order_products WHERE order_id=:id");
+   $stmt2->bindParam(':id',$id);
+   $stmt2->execute();
+   $order_products = $stmt2->fetchAll(PDO::FETCH_ASSOC);
+   ?>
表示します。
orders.phpのHTMLをコピーしてphpの下に貼り付けます。
タイトル・h3を「受注詳細」に変更します。
tableタグ内を全部削除します。
admin/order_products.php
?>
<!DOCTYPE html>
<html>
<head>
<!-- Global site tag (gtag.js) - Google Analytics -->
<script async src="https://www.googletagmanager.com/gtag/js?id=UA-13xxxxxxxxx"></script>
<script>
window.dataLayer = window.dataLayer || [];
function gtag() { dataLayer.push(arguments); }
gtag('js', new Date());
gtag('config', 'UA-13xxxxxxxxx');
</script>
<meta charset="utf-8">
<meta http-equiv="X-UA-Compatible" content="IE=edge">
<meta name="viewport" content="width=device-width, initial-scale=1.0">
<title>受注詳細</title>
<link rel="icon" href="favicon.ico">
<link rel="stylesheet" href="https://use.fontawesome.com/releases/v5.8.1/css/all.css"
integrity="sha384-50oBUHEmvpQ+1lW4y57PTFmhCaXp0ML5d60M1M7uH2+nqUivzIebhndOJK28anvf" crossorigin="anonymous">
<!-- css -->
<link rel="stylesheet" href="./styles.css">
</head>
<body>
<header>
<div class="container">
<div class="header-logo">
<h1><a href="dashboard.php">管理画面</a></h1>
</div>
<nav class="menu-right menu">
<a href="logout.php">ログアウト</a>
</nav>
</div>
</header>
<main>
<div class="wrapper">
<div class="container">
<div class="wrapper-title">
<h3>受注詳細</h3>
</div>
<div class="list">
<table>
</table>
</div>
</div>
</div>
</main>
<footer>
<div class="container">
<p>Copyright @ 2018 SQUARE, inc</p>
</div>
</footer>
<script src="https://ajax.googleapis.com/ajax/libs/jquery/3.2.1/jquery.min.js"></script>
</body>
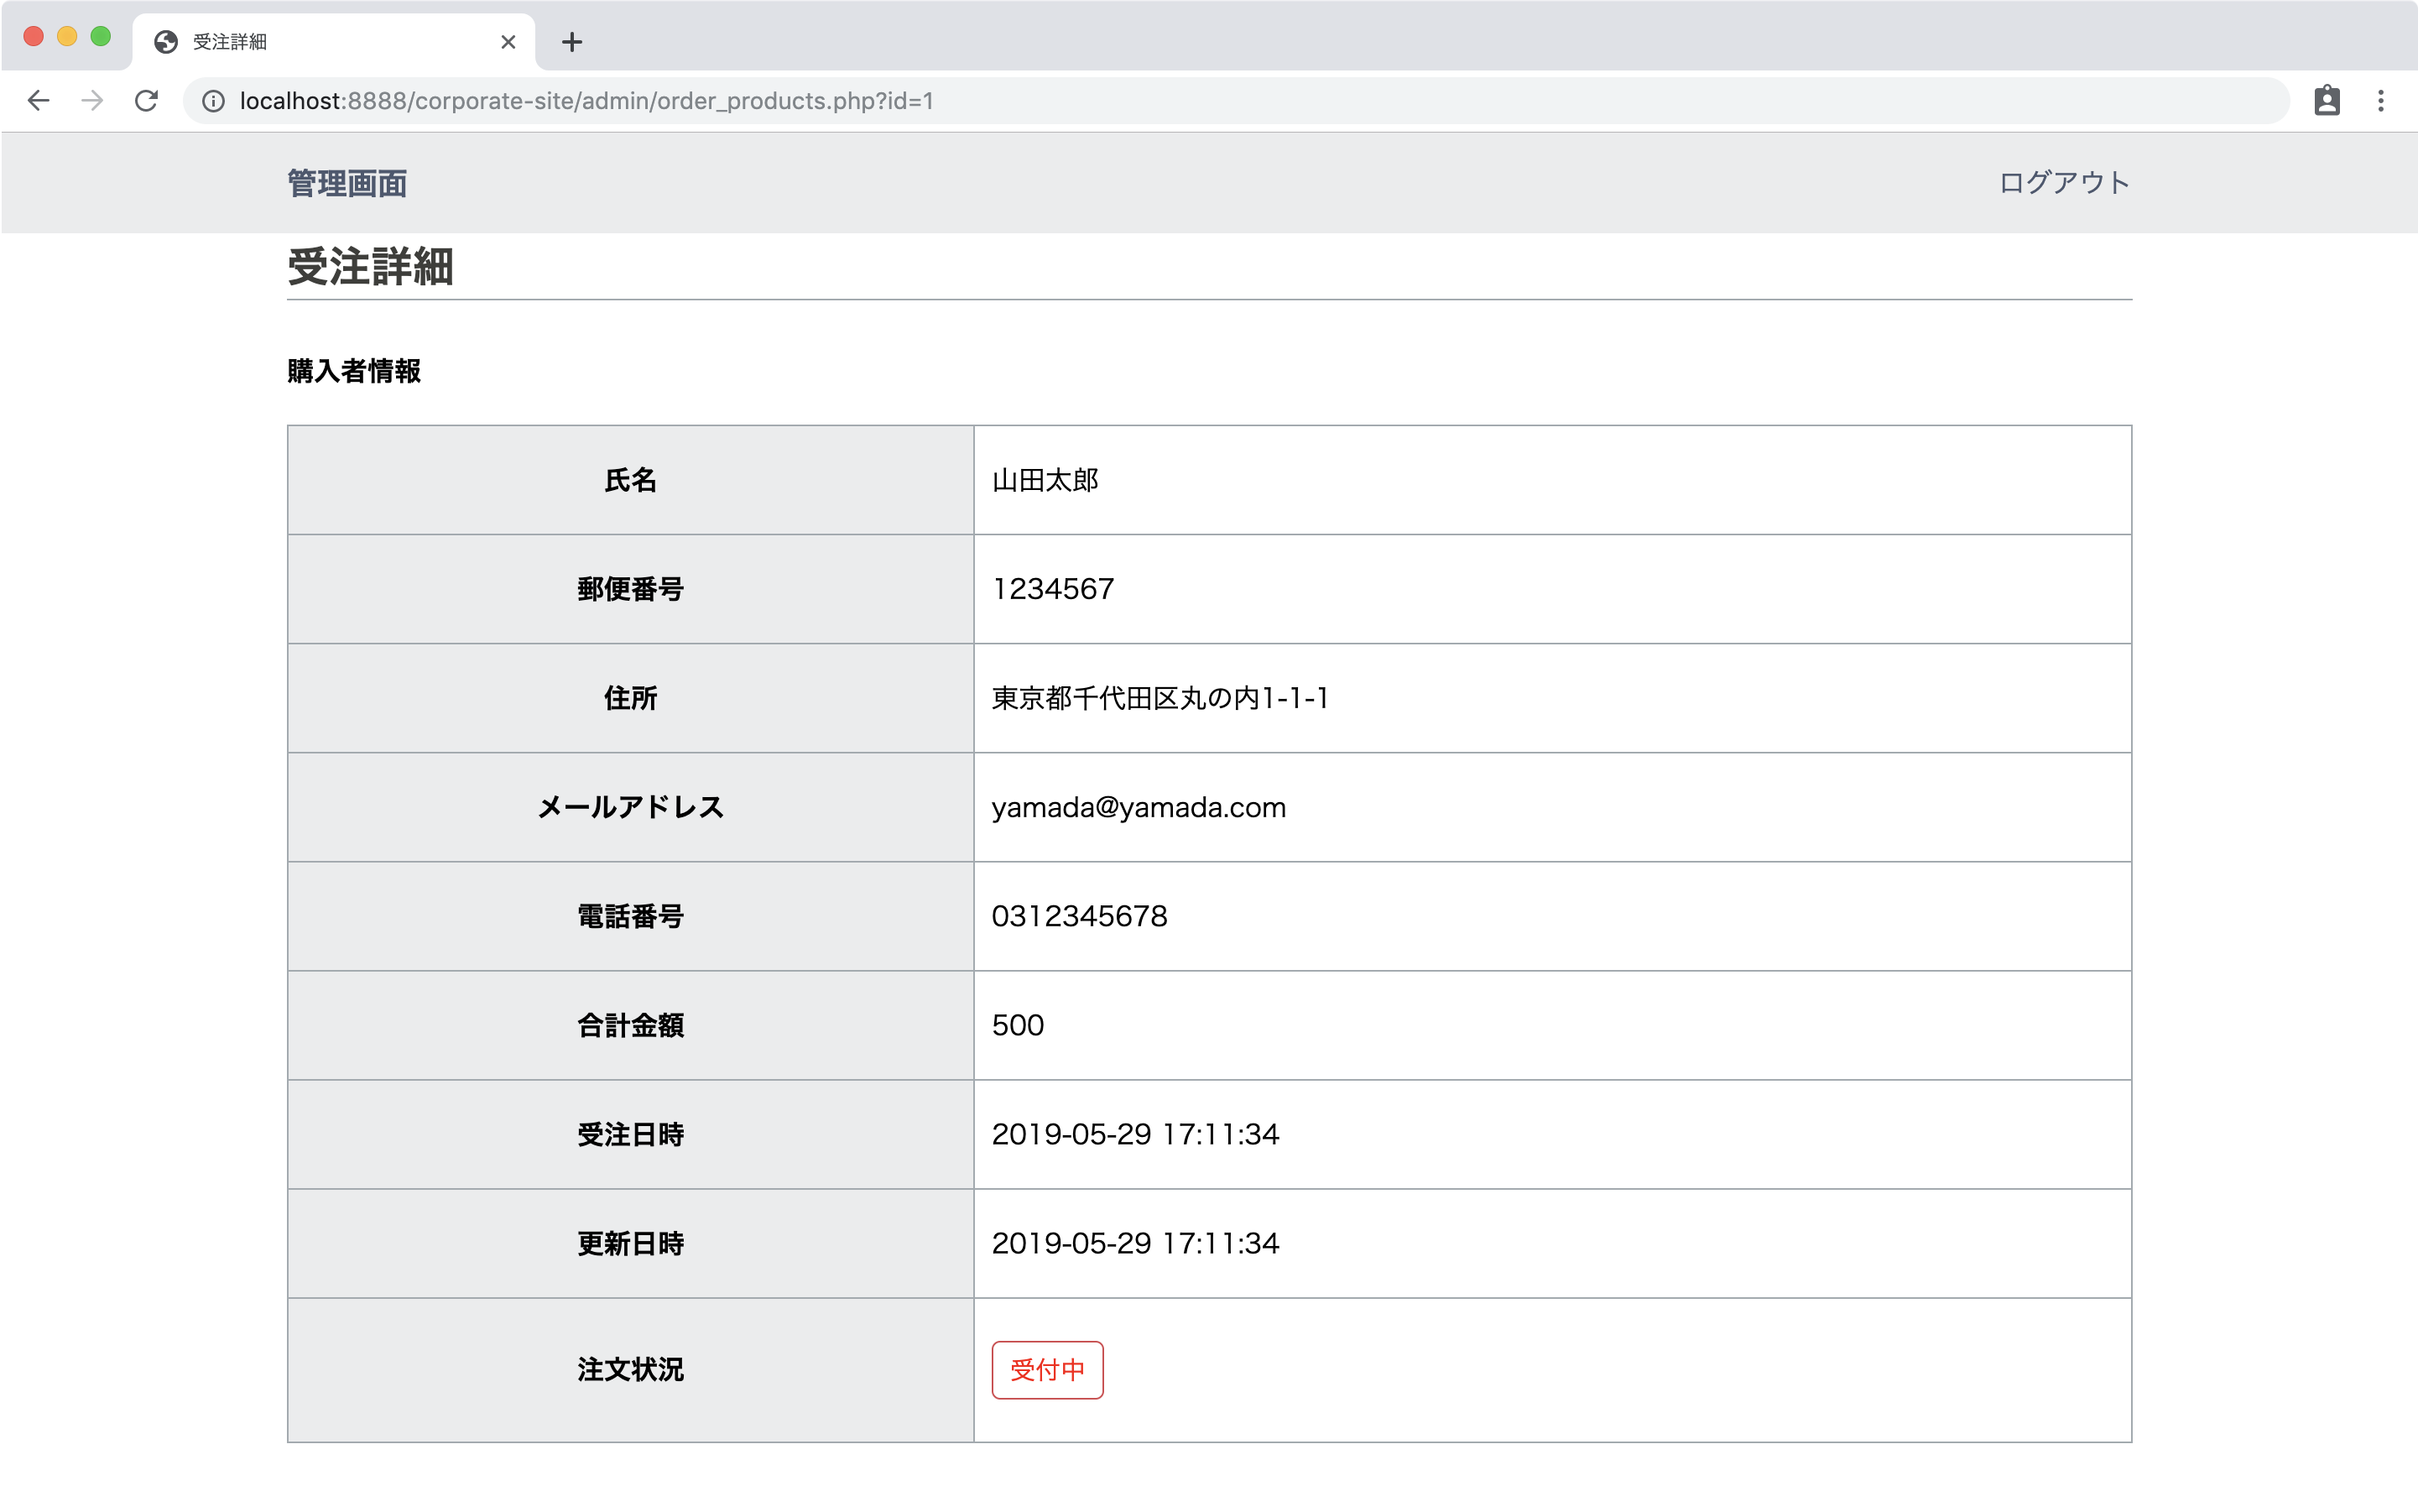
</html>まず、注文テーブルのデータを表示します。
admin/order_products.php
+   <h4>購入者情報</h4>
    <table>
+       <tbody>
+           <tr>
+               <th>氏名</th><td><?php echo $orders[0]['name']; ?></td>
+           </tr>
+           <tr>
+               <th>郵便番号</th><td><?php echo $orders[0]['postcode']; ?></td>
+           </tr>
+           <tr>
+               <th>住所</th><td><?php echo $orders[0]['address']; ?></td>
+           </tr>
+           <tr>
+               <th>メールアドレス</th><td><?php echo $orders[0]['email']; ?></td>
+           </tr>
+           <tr>
+               <th>電話番号</th><td><?php echo $orders[0]['tel']; ?></td>
+           </tr>
+           <tr>
+               <th>合計金額</th><td><?php echo $orders[0]['total']; ?></td>
+           </tr>
+           <tr>
+               <th>受注日時</th><td><?php echo $orders[0]['created_at']; ?></td>
+           </tr>
+           <tr>
+               <th>更新日時</th><td><?php echo $orders[0]['updated_at']; ?></td>
+           </tr>
+           <tr>
+               <th>注文状況</th>
+               <td><?php if($orders[0]['order_status']==0): ?>
+                       <button type="button" class="btn btn-red">受付中</button>
+                   <?php else: ?>
+                       <button type="button" class="btn btn-blue">発送済</button>
+                   <?php endif;?>
+               </td>
+           </tr>
+       </tbody>
    </table>
orders.phpから詳細をクリックして確認します。
注文者情報の下に、注文の詳細商品を表示します。
dmin/order_products.php
+   <h4>商品詳細</h4>
+   <table>
+       <thead>
+           <tr>
+               <th>id</th>
+               <th>注文ID</th>
+               <th>商品名</th>
+               <th>個数</th>
+               <th>金額</th>
+           </tr>
+       </thead>
+       <tbody>
+           <?php foreach($order_products as $order_product): ?>
+           <tr>
+               <td><?php echo $order_product['id']; ?></td>
+               <td><?php echo $order_product['order_id']; ?></td>
+               <td><?php echo $order_product['product_name']; ?></td>
+               <td><?php echo $order_product['num']; ?></td>
+               <td><?php echo $order_product['price']; ?></td>
+           </tr>
+           <?php endforeach; ?>
+       </tbody>
+   </table>
ブラウザを更新して確認します。
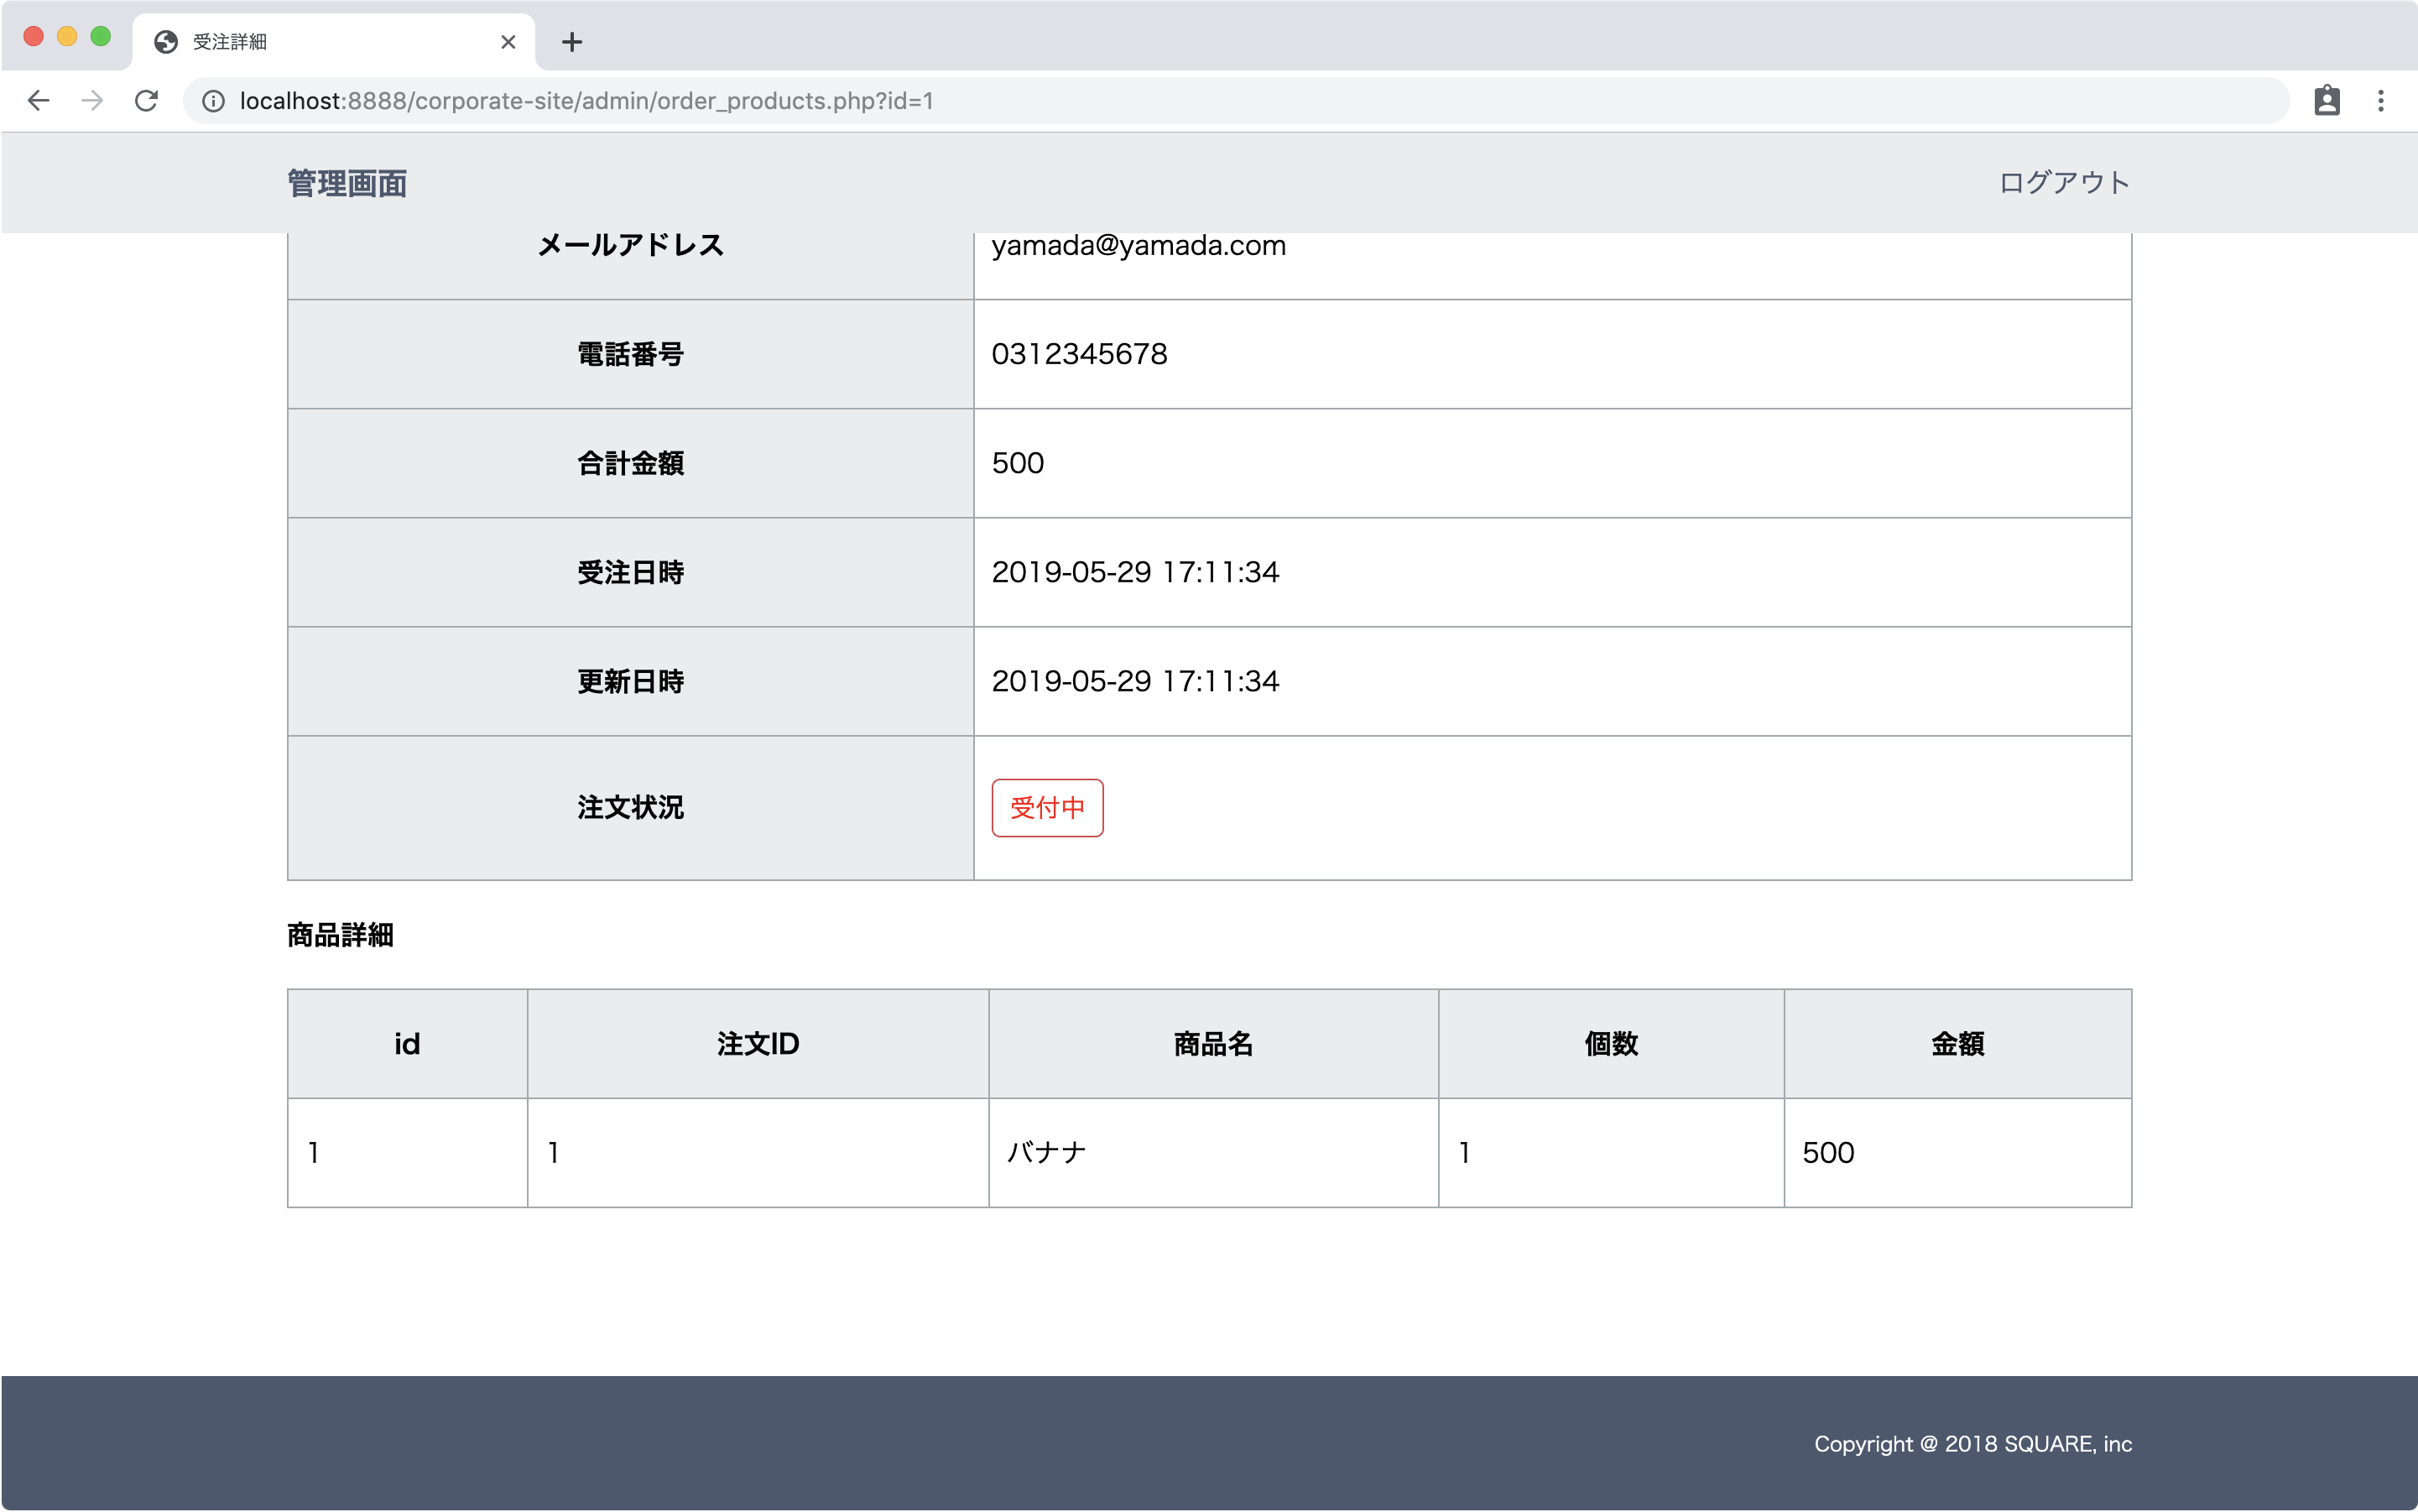
購入者情報の下に商品詳細も表示されていればOKです。
注文状況ステータス変更の実装
詳細画面から、注文状況ステータスの変更が行えるようにします。
ボタンをクリックしたら、発送状況変更するファイルのupdate_order_status.php(まだ作成していないファイルです)にidパラメータを付けて送るようにします。
ボタン追加
注文状況の表示部分に、「発送済みにする」ボタンを追加します。
admin/order_products.php
 <tr>
    <th>注文状況</th>
    <td><?php if($orders[0]['order_status']==0): ?>
            <button type="button" class="btn btn-red">受付中</button>
+           <button type="button" class="btn btn-blue" onclick="location.href='update_order_status.php?id=<?php echo $id; ?>'">発送済みにする</button>
        <?php else: ?>
            <button type="button" class="btn btn-blue">発送済</a></button>
        <?php endif;?>
    </td>
 </tr>
ステータス変更実行
adminフォルダ内にupdate_order_status.phpを作成します。
ログインチェックしてidを受け取ります。
idが送られてこなかったら変更できないので、orders.phpにリダイレクトします。
admin/update_order_status.php
<?php
    session_start();

    //ログインチェック
    if($_SESSION['admin_login'] == false){
        header("Location:./index.html");
        exit;
    }

    //id受け取り
    $id = isset($_GET['id'])? htmlspecialchars($_GET['id'], ENT_QUOTES, 'utf-8'):'';

    //idなかったらorders.phpにリダイレクト
    if($id==''){
        header('location:./orders.php');
    }
DBに接続します。
admin/update_order_status.php
    if($id==''){
        header('location:./orders.php');
    }

+   //DB接続
+   try{
+       $dbh = new PDO("mysql:host=localhost;dbname=corporate_db","root","root");
+   }catch(PDOException $e){
+       var_dump($e->getMessage());
+       exit;
+   }
UPDATE文でidを指定して、ordersテーブルのorder_statusを1に変更します。
admin/update_order_status.php
    //DB接続
    try{
        $dbh = new PDO("mysql:host=localhost;dbname=corporate_db","root","root");
    }catch(PDOException $e){
        var_dump($e->getMessage());
        exit;
    }

+   //update
+   $stmt = $dbh->prepare("UPDATE orders SET order_status = 1 WHERE id=:id");
+   $stmt->bindParam(":id",$id);
+   $stmt->execute();
更新が実行されたら、orders.phpにリダイレクトさせます。
admin/update_order_status.php
//update
$stmt = $dbh->prepare("UPDATE orders SET order_status = 1 WHERE id=:id");
$stmt->bindParam(":id",$id);
$stmt->execute();
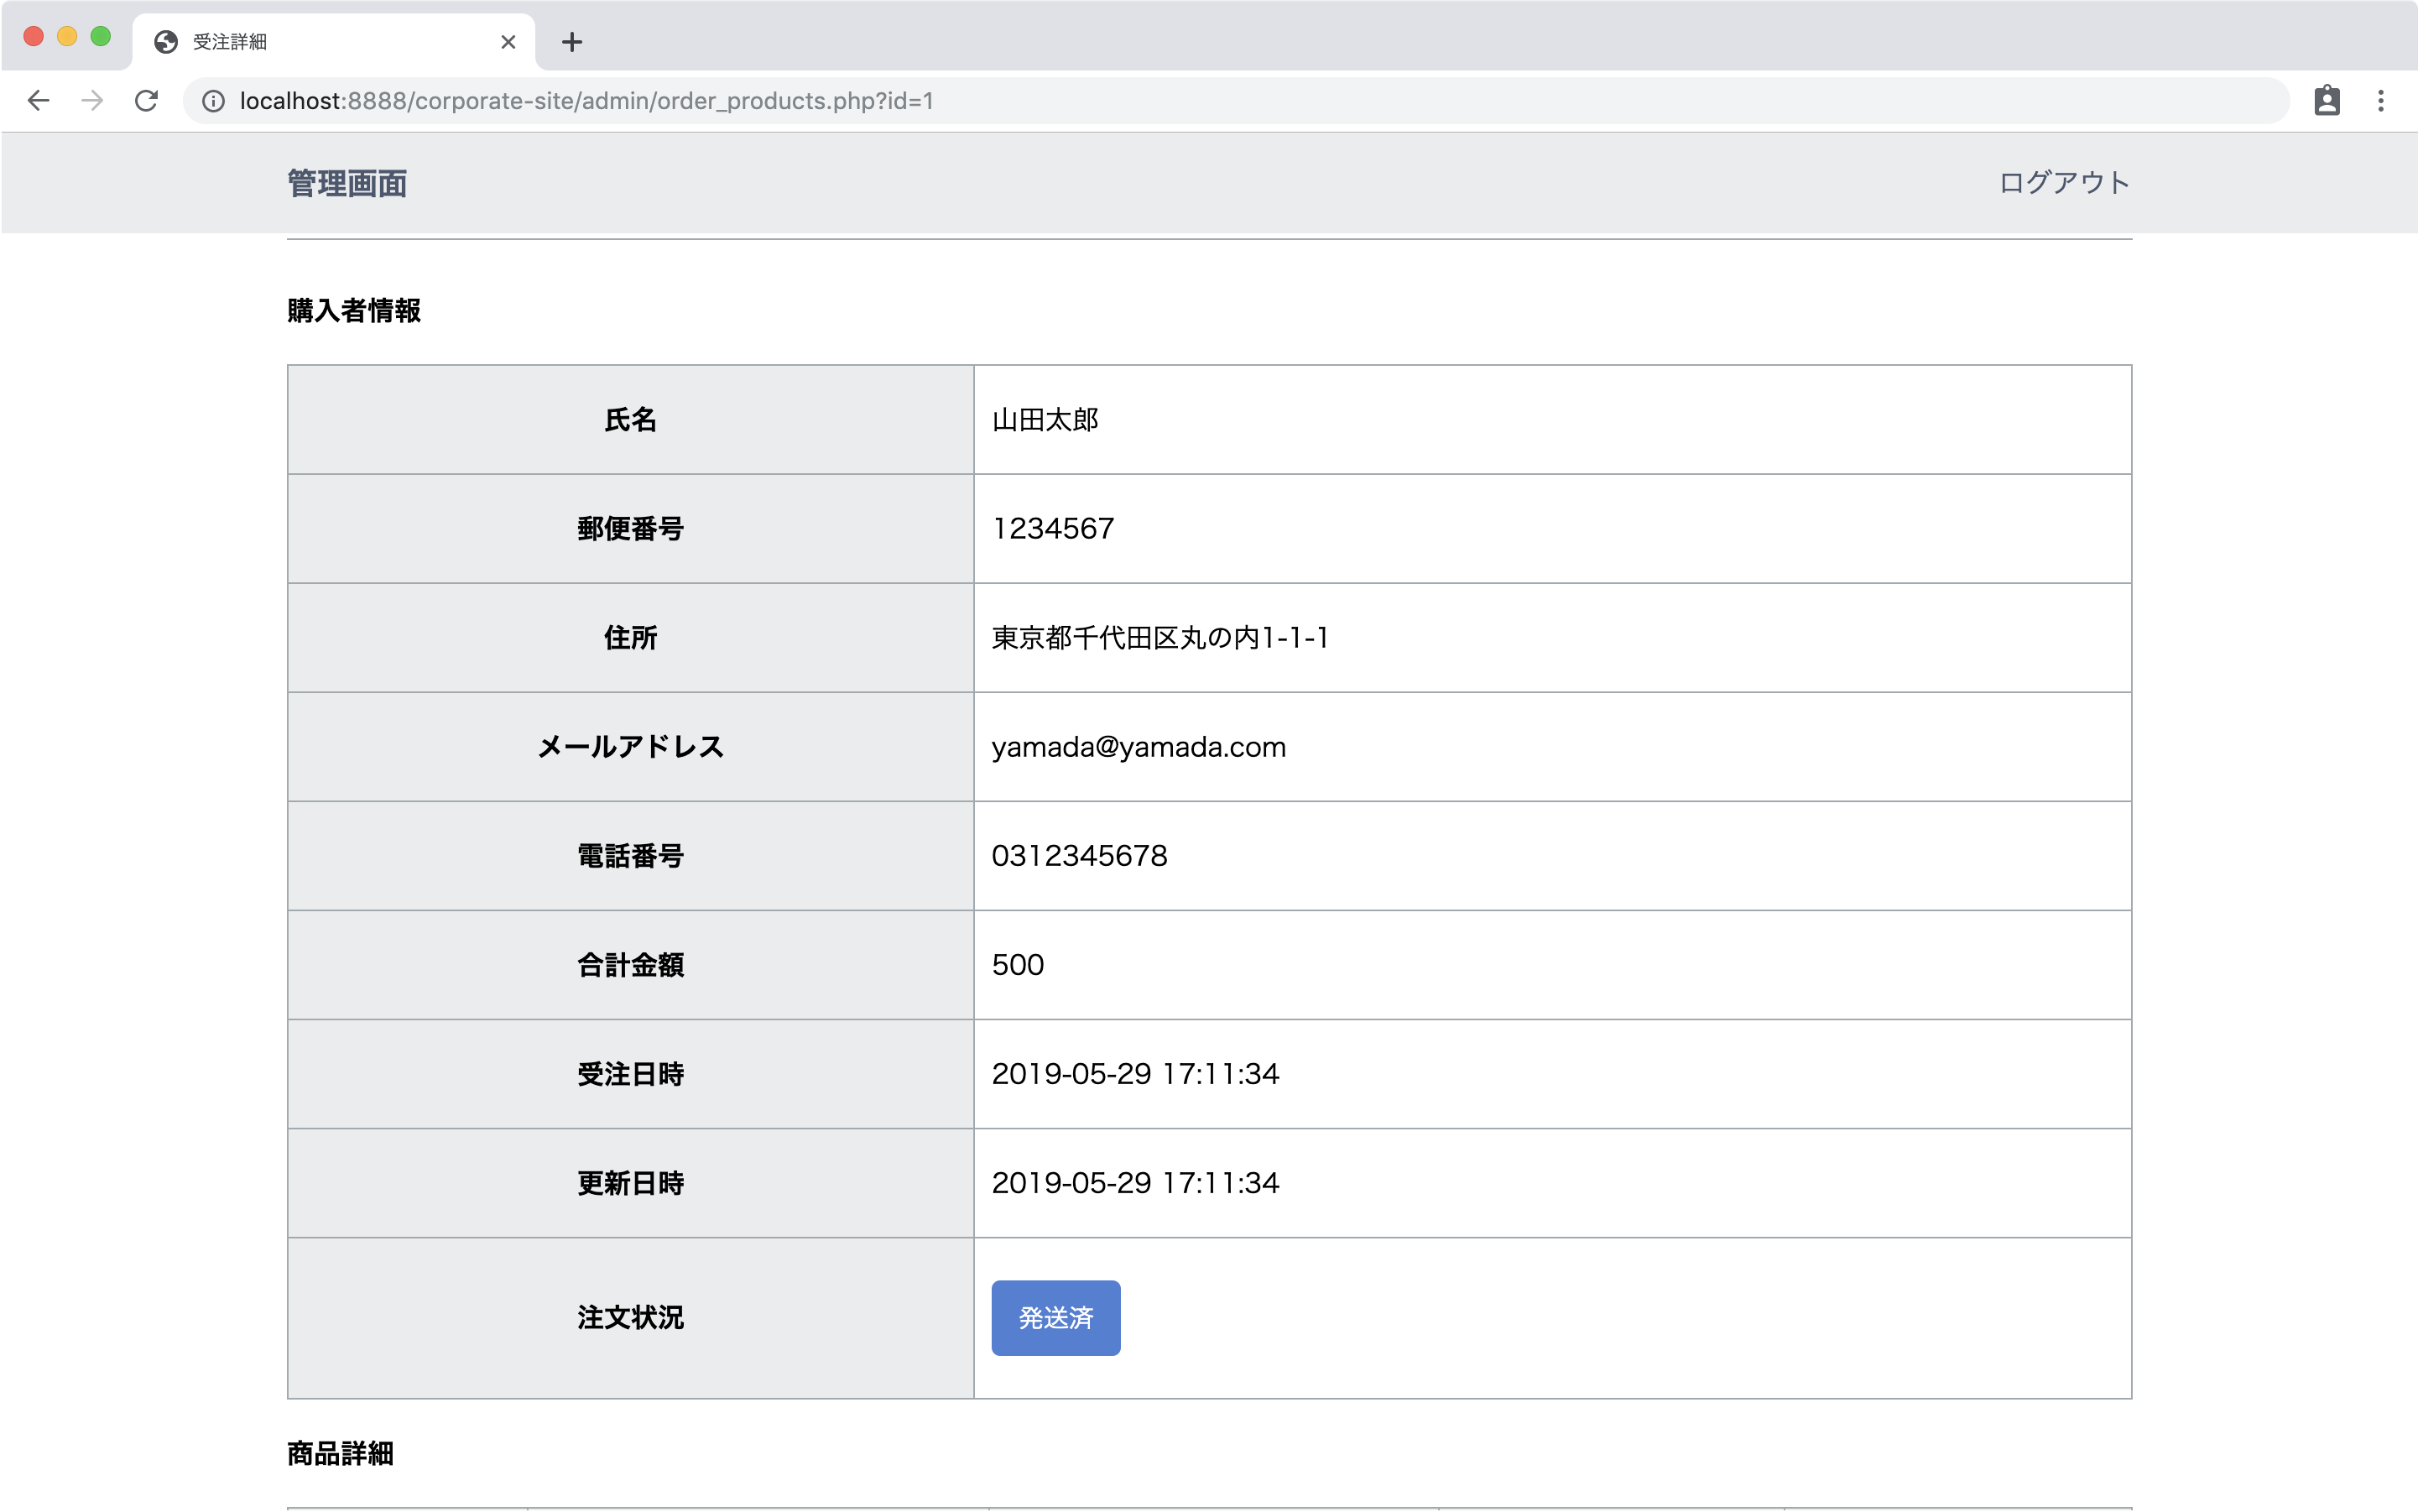
+ header('location:./orders.php');受注詳細画面から「発送済みにする」ボタンをクリックして動作確認をします。
うまく動いていれば、キャプチャのように、受注一覧の注文ステータスが変更されています。
詳細画面でもステータスが変更されているのを確認します。
これで受注管理画面の作成が完了しました。